

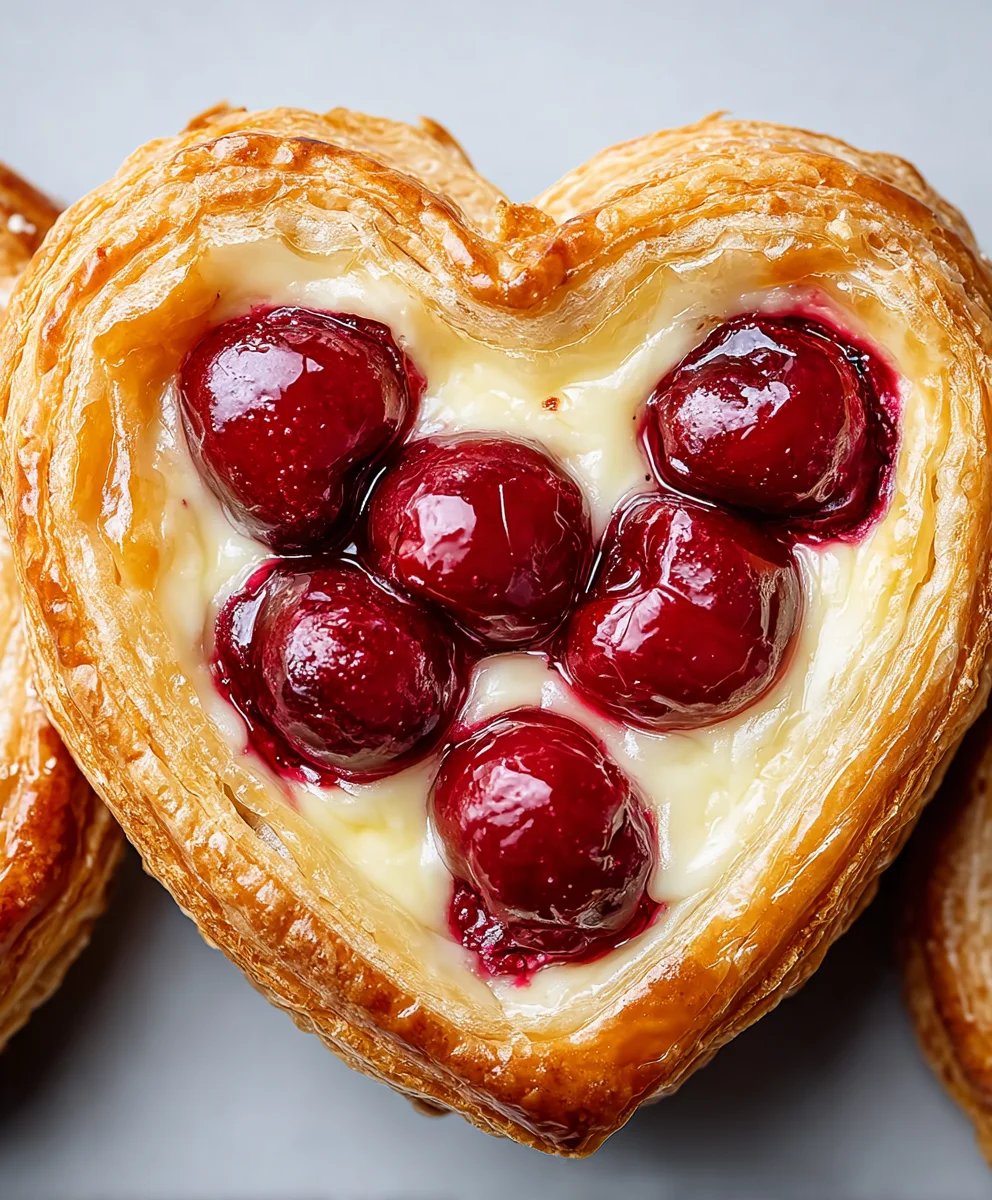
Heart-Shaped Cherry Cheese Danish are more than just a pastry; they’re a delightful expression of love, perfect for any occasion that calls for a touch of sweetness and a whole lot of charm. Imagin extracte biting into a flaky, buttery pastry, giving way to a luscious, creamy cheese filling, all crowned with the vibrant, slightly tart burst of ripe cherries. It’s this harmonious blend of textures and flavors that makes the Heart-Shaped Cherry Cheese Danish so utterly irresistible. People adore these for their beautiful presentation, making them ideal for Vnon-alcoholic alentine’s Day, anniversaries, or simply as a way to show someone you care. What truly sets this particular recipe apart is the perfect balance achieved between the rich, decadent cheese filling and the bright, fruity cherry topping, all encased in a delicate, golden pastry that practically melts in your mouth. Get ready to create a treat that’s as beautiful to look at as it is delicious to eat.

Ingredients:
- 4 ounces cream cheese, softened to room temperature
- ¼ cup granulated sugar
- 1 large egg yolk
- 1 tablespoon whole milk ricotta cheese
- ½ teaspoon almond extract (or vanilla extract if you prefer)
- Pinch of salt
- ½ tablespoon fresh lemon zest (from about half a lemon)
- 2 sheets of store-bought puff pastry, thawed according to package directions
- 1 can (approximately 21 ounces) cherry pie filling
- 1 large egg, for egg wash
- 1 tablespoon water, for egg wash
- All-purpose flour, for dusting your work surface
Preparing the Cream Cheese Filling
The heart of any good cheese danish is a rich, creamy filling, and ours is no exception. To start, in a medium-sized bowl, combine the softened cream cheese and granulated sugar. It’s crucial that the cream cheese is properly softened; if it’s too cold, you’ll end up with lumps. You can achieve this by leaving it on the counter for about an hour or by carefully microwaving it in short bursts, just until pliable. Once combined, beat them together with a whisk or an electric mixer on medium speed until the mixture is smooth and well incorporated, with no visible sugar granules. Next, add the egg yolk. This will give the filling a richer color and a smoother texture. Beat it in until it’s fully blended. Then, gently fold in the ricotta cheese. Ricotta adds a lovely subtle tang and a creamier consistency to the filling. Follow this with the almond extract (or vanilla, if you’re using that), the pinch of salt to balance the sweetness, and the freshly grated lemon zest. The lemon zest is a secret weapon here; it brightens up the rich cream cheese and complements the sweetness of the cherry filling beautifully. Mix everything together until just combined. Be careful not to overmix at this stage. Cover the bowl with plastic wrap and set it aside in the refrigerator while you prepare the puff pastry. Chilling the filling slightly will make it firmer and easier to handle.
Assembling the Heart-Shaped Cherry Cheese Danishes
Now for the fun part – shaping our danishes! Lightly flour a clean work surface. Gently unfold one sheet of thawed puff pastry. You want to work with it quickly so it stays cold and easy to manage. If it feels sticky, dust your hands with a little flour too. Using a sharp knife or a pastry wheel, trim the edges of the puff pastry sheet to create a clean rectangle. You should aim for roughly 9×9 inches. Then, cut this rectangle into two equal squares. Repeat this process with the second sheet of puff pastry, so you’ll have a total of four squares. Now, take each puff pastry square and fold it diagonally to form a triangle. Press the edges firmly to seal this fold. To create the heart shape, you’ll need to make a small cut. Starting from the open, longest edge of the triangle, make a cut that is about halfway up the side. Then, bring the two points of the open edge together and pinch them firmly to seal, creating the classic heart shape. Ensure the seal is secure so the filling doesn’t leak out during baking. You should have four puff pastry hearts. Carefully place these heart shapes onto a baking sheet lined with parchment paper. It’s a good idea to leave some space between them as they will puff up during baking.
Filling and Egg Wash
With your heart shapes ready, it’s time to fill them. Remove the chilled cream cheese mixture from the refrigerator. Give it a quick stir to ensure it’s still smooth. Spoon about 1 to 1.5 tablespoons of the cream cheese filling into the center of each puff pastry heart. Don’t overfill them, as the filling will expand slightly and you want to leave room for the cherry topping. Now, open the can of cherry pie filling. Spoon a generous tablespoon of the cherry pie filling directly on top of the cream cheese mixture in each heart. Try to get a good ratio of cherries to the syrupy filling. This vibrant red topping is what makes these danishes so visually appealing and delicious. Next, prepare the egg wash. In a small bowl, whisk together the large egg and the tablespoon of water until thoroughly combined. This mixture will give your danishes a beautiful golden-brown, glossy finish. Using a pastry brush, gently brush the exposed edges of the puff pastry hearts with the egg wash. Be careful not to let the egg wash drip onto the parchment paper, as this can cause the pastry to stick. Ensure you get an even coating for consistent browning.
Baking to Perfection
Preheat your oven to 400 degrees Fahrenheit (200 degrees Celsius). This higher temperature is ideal for puff pastry as it helps it to puff up quickly and become flaky. Once the oven is preheated and your danishes are assembled and brushed with egg wash, carefully place the baking sheet into the oven. Bake for approximately 18 to 22 minutes, or until the puff pastry is puffed, golden brown, and cooked through. You’ll notice the pastry rising dramatically, creating lovely layers. The filling should be bubbly, and the edges of the pastry should be a deep, appetizing golden color. Keep an eye on them towards the end of the baking time, as ovens can vary. If you notice any areas browning too quickly, you can loosely tent them with aluminum foil.
Cooling and Serving
Once baked to perfection, carefully remove the baking sheet from the oven. Let the heart-shaped cherry cheese danishes cool on the baking sheet for about 5 to 10 minutes. This allows them to set slightly and makes them easier to handle. After this initial cooling period, you can carefully transfer them to a wire rack to cool completely. They are absolutely divine served warm, but they are also delicious at room temperature. For an extra touch of indulgence, you can lightly dust them with powdered sugar just before serving, or drizzle them with a little extra cherry syrup if you have any leftover. These make a wonderful treat for breakfast, brunch, or even an afternoon tea. Enjoy the delightful combination of flaky pastry, creamy cheese filling, and sweet, tart cherries!
Conclusion:
There you have it – the delightful and surprisingly achievable Heart-Shaped Cherry Cheese Danish! We’ve walked through each step, from creating the flaky pastry to crafting the luscious cherry and cream cheese filling, all designed to result in a beautiful and delicious treat. These danishes are perfect for special occasions, a romantic gesture, or simply as a way to brighten any day.
For serving, I love to enjoy my Heart-Shaped Cherry Cheese Danish slightly warm, perhaps with a dusting of powdered sugar or a drizzle of extra cherry glaze. They are also wonderful with a cup of coffee or tea. Feel free to get creative with your toppings! A dollop of whipped cream or a sprinkle of slivered almonds can elevate them even further.
Don’t be afraid to experiment with the filling. While cherries are classic, you could try a mix of berries, or even a lemon-curd filling for a tangy twist. The key is the buttery puff pastry and the creamy cheese base, which are versatile enough to accommodate various fruits. I encourage you to give this recipe a try. The satisfaction of presenting these charming, homemade danishes is truly rewarding. Happy baking!
Frequently Asked Questions:
Q1: Can I make the pastry dough from scratch instead of using store-bought puff pastry for my Heart-Shaped Cherry Cheese Danish?
Absolutely! While store-bought puff pastry is a fantastic time-saver, making your own pâte feuilletée will result in an even more authentic and incredibly flaky crust. It’s a more involved process, but the results are well worth the effort if you have the time and inclination. Just ensure your butter is well-chilled and your folding technique is consistent for maximum layers.
Q2: My Heart-Shaped Cherry Cheese Danish are browning too quickly on the bottom. What can I do?
This can happen if your oven runs hot or if the baking sheet is too close to the heating element. To prevent this, you can try placing a baking sheet on the rack below your danishes to act as a heat shield. Alternatively, you can bake your Heart-Shaped Cherry Cheese Danish on a slightly lower oven temperature for a few minutes longer. Keeping an eye on them throughout the baking process is key!

Heart-Shaped Cherry Cheese Danish Recipe
A delightful recipe for heart-shaped cherry cheese danishes featuring a creamy, tangy filling encased in flaky puff pastry and topped with sweet cherry pie filling.
Ingredients
-
4 ounces cream cheese, softened
-
1/4 cup granulated sugar
-
1 large egg yolk
-
1 tablespoon whole milk ricotta cheese
-
1/2 teaspoon almond extract
-
Pinch of salt
-
1/2 tablespoon fresh lemon zest
-
2 sheets store-bought puff pastry, thawed
-
1 can (approximately 21 ounces) cherry pie filling
-
1 large egg
-
1 tablespoon water
-
All-purpose flour, for dusting
Instructions
-
Step 1
Prepare the cream cheese filling: Combine softened cream cheese and sugar in a bowl. Beat until smooth. Add egg yolk, ricotta cheese, almond extract, salt, and lemon zest. Mix until just combined. Cover and refrigerate. -
Step 2
Assemble the danishes: Lightly flour a work surface. Unfold puff pastry and cut each sheet into two 9×9 inch rectangles, then cut each rectangle into two equal squares, yielding four squares. Fold each square diagonally into a triangle and seal edges. Make a cut about halfway up the longest edge of each triangle. Bring the two points of the open edge together and pinch firmly to seal, forming a heart shape. Place on a parchment-lined baking sheet. -
Step 3
Fill the danishes: Spoon 1 to 1.5 tablespoons of the chilled cream cheese filling into the center of each puff pastry heart. Spoon a tablespoon of cherry pie filling over the cream cheese mixture. -
Step 4
Prepare and apply egg wash: Whisk together 1 large egg and 1 tablespoon of water in a small bowl. Gently brush the exposed edges of the puff pastry hearts with the egg wash. -
Step 5
Bake the danishes: Preheat oven to 400°F (200°C). Bake for 18-22 minutes, or until the puff pastry is puffed, golden brown, and cooked through. -
Step 6
Cool and serve: Remove danishes from the oven and let them cool on the baking sheet for 5-10 minutes before transferring to a wire rack to cool completely. Dust with powdered sugar or drizzle with extra syrup if desired.
Important Information
Nutrition Facts (Per Serving)
It is important to consider this information as approximate and not to use it as definitive health advice.
Allergy Information
Please check ingredients for potential allergens and consult a health professional if in doubt.

Leave a Comment