

Sandwich Rolls -No Knead -2 Hours are the answer to your weeknight dinner dilemma and your weekend brunch dreams all rolled into one delicious package. Forget the hours of kneading and waiting for dough to rise; this recipe is designed for the busy home baker who craves that satisfying, homemade bread experience without the fuss. What makes these sandwich rolls so universally loved? It’s their incredible versatility, of course! Perfect for cradling your favorite deli meats and cheeses, slathering with butter and jam, or serving alongside a hearty soup, they are the unsung heroes of any meal. But the true magic of these Sandwich Rolls -No Knead -2 Hours lies in their effortlessly tender crum extractb and slightly chewy crust, achieved through a simple, time-efficient method. You’ll be amazed at how easily you can create bakery-quality rolls in just a couple of hours, making them an ideal choice for impromptu gatherings or simply treating yourself to something truly special.”

Ingredients:
- 4 1/2 cups (600g) bread flour (all-purpose flour or white flour can also be used)
- 1 3/4 cups (420-450ml) warm water (around 35-40 degrees Celsius or 95-105 degrees Fahrenheit)
- 2 tablespoons instant or quick-rise yeast
- 1 tablespoon granulated sugar
- 2 teaspoons salt
Preparing the Dough
Mixing the Ingredients
The beauty of these sandwich rolls lies in their simplicity, particularly the no-knead method. Begin extract by gathering all your ingredients. In a large mixing bowl, the biggest one you have, combine the bread flour, granulated sugar, and salt. Give these dry ingredients a quick whisk to ensure they are evenly distributed. This initial step prevents pockets of salt or sugar from forming in the dough, leading to a more uniform flavor throughout your rolls.
Next, it’s time to introduce the yeast and water. Make sure your water is warm, not hot. You can test this by dipping your finger in – it should feel pleasantly warm, like a comfortable bath. If it’s too hot, it can kill the yeast, and if it’s too cold, the yeast won’t activate properly. Pour the warm water into the bowl with the dry ingredients. Then, sprinkle the instant yeast evenly over the surface of the water and flour mixture. You don’t need to dissolve the yeast separately; the instant variety works directly in the dough.
Combining and Developing the Dough
Now, let’s bring it all together. Using a sturdy spoon, spatula, or even your hands, start mixing the ingredients. The goal here is not to knead but simply to combine everything until there are no dry patches of flour visible. The dough will be quite wet and shaggy at this stage, which is exactly what we want for a no-knead bread. It might seem like there’s not enough liquid, but trust the process. Continue to mix until a cohesive, albeit sticky, dough forms. This should take about 1-2 minutes. Avoid the temptation to add more flour, as this will result in a denser, less airy roll.
Once you have a shaggy mass, scrape down the sides of the bowl to ensure all the dough is gathered in the center. Cover the bowl tightly with plastic wrap or a damp kitchen towel. This is crucial for trapping the moisture, which will help the dough rise and develop its gluten structure without any physical manipulation. Place the covered bowl in a warm, draft-free spgin extractto begin its first rise. This could be near a slightly warm oven (turned off, of course!), on top of your refrigerator, or simply on your countertop if your kitchen is sufficiently warm. This first rise is where the magic of ngin extractnead truly begins to work, developing flavor and texture.
The Rising and Shaping
First Rise (Bulk Fermentation)
Allow the dough to rest and rise for at least 1 hour, or up to 1 hour and 30 minutes. During this time, the yeast will work its magic, producing carbon dioxide bubbles that will give your rolls their signature airy texture. You’ll notice the dough increase significantly in volume, roughly doubling in size. It will become bubbly and less sticky than it was initially. Resist the urge to peek too often; let the dough do its thing undisturbed. A longer rise time can develop more complex flavors, so don’t be afraid to let it go a bit longer if you have the time.
Shaping the Rolls
After the first rise, gently uncover the bowl. The dough will be puffy and airy. Lightly dust a clean work surface with a little flour. Using a dough scraper or your hands, carefully scrape the dough out of the bowl onto the floured surface. You don’t want to punch down the dough aggressively; we want to preserve as much of that trapped air as possible. Gently pat or stretch the dough into a rough rectangle, about 1/2 inch thick.
Now, it’s time to shape your rolls. You can do this in a couple of ways. For classic sandwich rolls, you can fold the dough in thirds, like a letter, and then cut it into individual portions. Alternatively, you can simply cut the rectangle into your desired roll size. For standard sandwich rolls, aim for about 8-10 pieces. Once you have your portions, gently tuck the edges under to create a smooth, rounded top and a flatter bottom. This helps them hold their shape during baking. Place the shaped rolls onto a baking sheet lined with parchment paper, ensuring there’s a little space between them as they will expand further.
Second Rise and Baking
Second Rise (Proofing)
Cover the shaped rolls loosely with plastic wrap or a clean kitchen towel. Allow them to rest for another 30-45 minutes. During this second rise, the rolls will puff up again, becoming noticeably fuller and lighter. This proofing stage is essential for ensuring a light and tender crum extractb. You’ll know they’re ready when they’ve increased in size by about 50% and feel springy to the touch. If you gently poke one, the indentation should slowly spring back.
Baking the Rolls
While the rolls are proofing, preheat your oven to 220 degrees Celsius (425 degrees Fahrenheit). Placing a shallow pan of hot water on the bottom rack of your oven during preheating can create steam. This steam helps the crust develop a beautiful golden-brown color and a lovely crisp exterior, while keeping the inside tender. Once your oven is fully preheated and the rolls have completed their second rise, carefully remove the steam pan (be cautious of the hot steam).
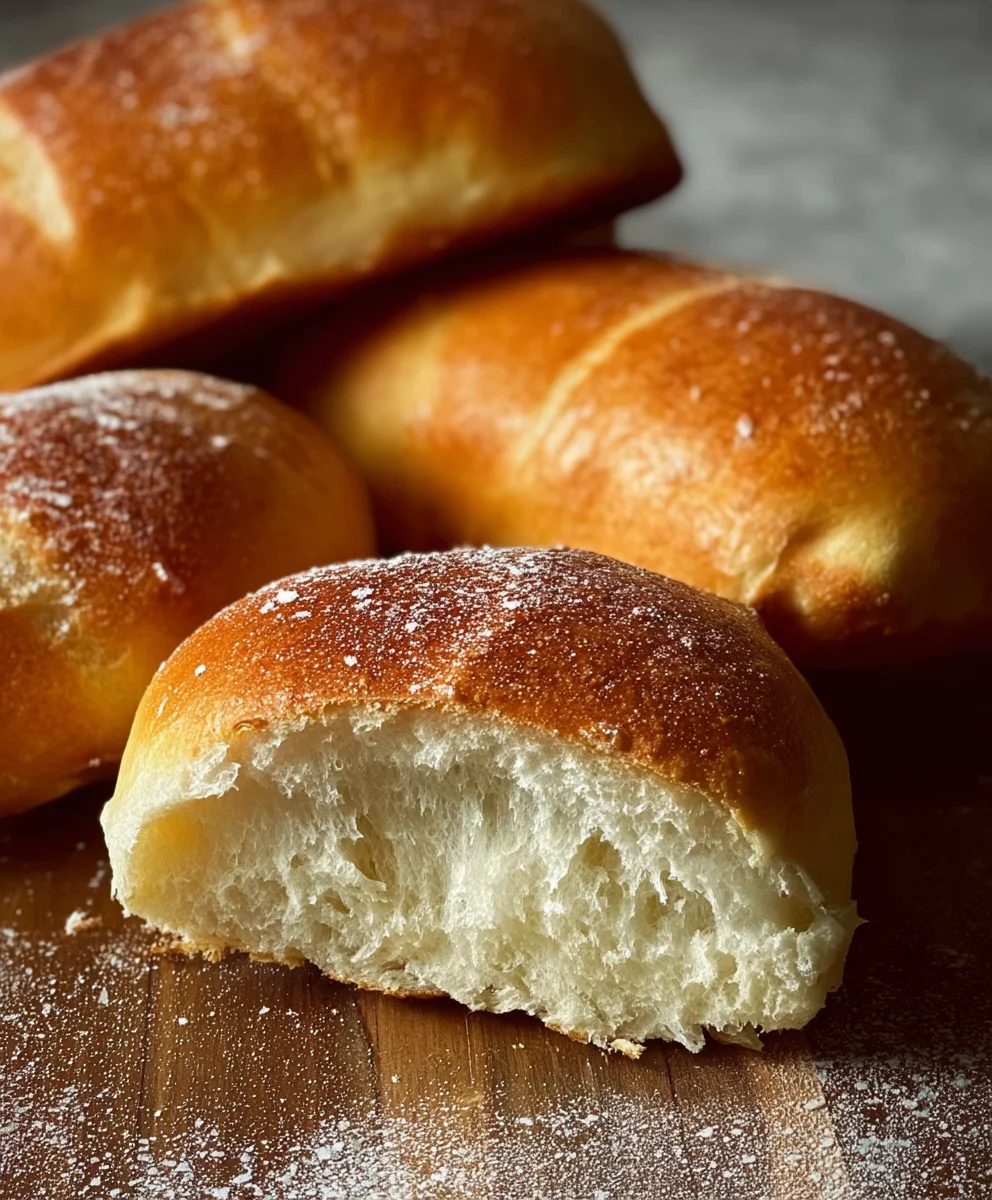
Place the baking sheet with the proofed rolls into the preheated oven. Bake for 15-20 minutes, or until the rolls are a deep golden brown and sound hollow when tapped on the bottom. The exact baking time will vary depending on your oven and the size of your rolls. Keep an eye on them towards the end of the baking time to prevent over-browning. Once baked, immediately transfer the rolls to a wire rack to cool completely. This prevents the bottoms from becoming soggy. Enjoy your homemade, no-knead sandwich rolls!
Conclusion:
You’ve now unlocked the secret to perfectly soft and airy Sandwich Rolls -No Knead -2 Hours! This recipe is a testament to how simple ingredients and minimal effort can yield truly delightful results. Whether you’re a seasoned baker or just starting out, these rolls are incredibly forgiving and will consistently impress. Their slightly chewy crust and fluffy interior make them the ideal foundation for any sandwich creation.
I highly recommend serving these fresh Sandwich Rolls -No Knead -2 Hours warm with your favorite deli meats, cheeses, or even just a smear of butter. They are also fantastic as a side for soups and stews. For variations, feel free to incorporate herbs like rosemary or thyme into the dough, or sprinkle some sesame or poppy seeds on top before baking for added flavor and texture. Don’t be afraid to experiment and make them your own!
I truly hope you enjoy making and devouring these wonderful Sandwich Rolls -No Knead -2 Hours as much as I do. Happy baking!
Frequently Asked Questions:
Q: Can I freeze these Sandwich Rolls -No Knead -2 Hours?
A: Yes, absolutely! Once cooled completely, you can store them in an airtight container or freezer bag for up to 3 months. To reheat, simply place them in a warm oven for a few minutes until thawed and heated through.
Q: My rolls didn’t rise as much as yours. What could I have done wrong?
A: Ensure your yeast was fresh and active. Also, the ambient temperature of your kitchen can affect the rise. A warmer environment usually encourages a better rise. Make sure you allowed the full two hours for proofing, as this no-knead method relies heavily on time for gluten development and rising.

Easy No Knead Sandwich Rolls – Hour Recipe
Delicious and simple no-knead sandwich rolls that are perfect for any meal. This recipe uses a minimal rise time for quick results.
Ingredients
-
4 1/2 cups (600g) bread flour
-
1 3/4 cups (420-450ml) warm water (around 35-40 degrees Celsius or 95-105 degrees Fahrenheit)
-
2 tablespoons instant or quick-rise yeast
-
1 tablespoon granulated sugar
-
2 teaspoons salt
Instructions
-
Step 1
In a large mixing bowl, combine bread flour, granulated sugar, and salt. Whisk to distribute evenly. Sprinkle the instant yeast over the mixture. Add warm water and mix with a spoon or hands until no dry flour is visible, forming a shaggy, sticky dough. Avoid adding extra flour. -
Step 2
Scrape down the sides of the bowl. Cover tightly with plastic wrap or a damp towel and let rise in a warm, draft-free place for 1 to 1.5 hours, or until doubled in size. -
Step 3
Gently scrape the risen dough onto a lightly floured surface. Pat or stretch into a rough rectangle about 1/2 inch thick. Fold the dough in thirds like a letter or cut directly into 8-10 portions for individual rolls. Tuck edges under to shape. -
Step 4
Place shaped rolls on a parchment-lined baking sheet with space between them. Cover loosely and let proof for another 30-45 minutes until puffy and about 50% larger. -
Step 5
Preheat oven to 220 degrees Celsius (425 degrees Fahrenheit). A pan of hot water on the bottom rack can create steam for a crispier crust. -
Step 6
Remove steam pan (if used). Bake for 15-20 minutes, or until deep golden brown and hollow sounding when tapped. Cool completely on a wire rack.
Important Information
Nutrition Facts (Per Serving)
It is important to consider this information as approximate and not to use it as definitive health advice.
Allergy Information
Please check ingredients for potential allergens and consult a health professional if in doubt.


Leave a Comment