


The Best Soft Chocolate Chip Cookies are a dream come true for any cookie lover. We all have that memory, right? The perfect cookie that’s warm, gooey, and melts in your mouth. It’s the comforting embrace of childhood, the perfect companion to a glass of cold milk, and the ultimate treat after a long day. What makes these soft chocolate chip cookies so universally beloved? It’s that magical balance: a slightly crisp edge that gives way to a pillowy, chewy center, studded with molten pockets of rich chocolate. Forget the dry, crum extractbly imposters; my mission is to guide you to cookie perfection. These aren’t just cookies; they’re an experience, a little piece of happiness baked just for you. Get ready to discover your new go-to recipe for the best soft chocolate chip cookies you’ve ever tasted.

The Best Soft Chocolate Chip Cookies
There’s something undeniably magical about a perfectly soft, chewy chocolate chip cookie. It’s a classic for a reason, a comforting bite that brings back childhood memories and never fails to satisfy a sweet craving. After years of experimenting and perfecting my recipe, I can confidently say this is the one. This recipe yields cookies that are wonderfully soft in the center, with slightly crisp edges, and absolutely loaded with melty chocolate. The key lies in a few simple techniques and, of course, using quality ingredients. Let’s get baking!
Ingredients:
Getting Started: The Foundation of Flavor
Before you even think about mixing, make sure your butter is softened to room temperature. This is crucial for creaming properly with the sugars, which creates the airy base for our cookies. You want it soft enough that you can easily make an indentation with your finger, but not so soft that it’s greasy or melted. If you forgot to leave your butter out, you can quickly soften it by cutting it into smaller pieces and letting it sit on the counter for about 10-15 minutes, or even by gently microwaving it in short bursts of 5-10 seconds, being very careful not to melt it.
Mixing the Wet Ingredients
In a large mixing bowl, begin extract by creaming together the softened salted butter, white sugar (I find raw cane sugar adds a lovely texture and slight caramel note), and packed light brown sugar. Use an electric mixer (handheld or stand mixer) on medium speed and beat until the mixture is light and fluffy, which usually takes about 2-3 minutes. This step is essential for incorporating air into the dough, which contributes to the cookie’s texture. Scrape down the sides of the bowl as needed to ensure everything is well combined. Next, beat in the vanilla extract, making sure it’s fully incorporated. Finally, add the egg and beat until just combined. Be careful not to overmix at this stage, as overmixing can lead to tougher cookies. The mixture should look smooth and well-emulsified.
Combining the Dry Ingredients and Adding Them to the Wet
In a separate medium bowl, whisk together the all-purpose flour, baking soda, and salt. I always add a tiny pinch more salt than the recipe calls for; I find it really enhances the chocolate flavor and balances the sweetness. Whisking the dry ingredients together first helps to distribute the leavening agent (baking soda) evenly, preventing pockets of bitterness in your cookies. Gradually add the dry ingredients to the wet ingredients, mixing on low speed until just combined. It’s important to stop mixing as soon as you no longer see streaks of flour. Overmixing the flour will develop the gluten too much, resulting in dense, tough cookies, and we are aiming for soft and chewy!
Folding in the Chocolatey Goodness
Now for the best part – the chocolate! Gently fold in your chocolate chips and chunks using a rubber spatula or wooden spoon. I love using a mix of both because the chips melt into gooey pockets, while the chunks provide satisfying bites of chocolate. Don’t be afraid to really pack them in there; you want a generous amount of chocolate in every bite. Distribute them evenly throughout the dough.
Chilling and Baking for Perfect Texture
This is a step that many people skip, but it’s the secret to achieving that perfect soft and chewy center. Cover the bowl of cookie dough with plastic wrap and refrigerate for at least 30 minutes, or even better, for a few hours. Chilling the dough allows the flavors to meld and the flour to hydrate, which results in a richer flavor and a chewier texture. It also helps prevent the cookies from spreading too much in the oven.
Preheat your oven to 375°F (190°C). Line baking sheets with parchment paper or silicone baking mats. This prevents sticking and ensures even baking. Scoop rounded tablespoons of dough onto the prepared baking sheets, leaving about 2 inches of space between each cookie. They will spread as they bake.
Bake for 9-11 minutes, or until the edges are lightly golden brown and the centers still look slightly underbaked. This is the key to that soft, gooey center! They will continue to cook and set up as they cool on the baking sheet. Let the cookies cool on the baking sheets for 5 minutes before transferring them to a wire rack to cool completely. Enjoying them warm is a must, but they are also delicious at room temperature. For the absolute best texture, I love to let them sit in an airtight container for a day or two – they somehow get even softer and more delicious!

Conclusion:
I’m so thrilled you’ve decided to bake theseThe Best Soft Chocolate Chip Cookies! We’ve reached the end of our baking journey, and I truly believe this recipe delivers that perfect soft, chewy center with slightly crisp edges that so many of us crave. The secret lies in the balance of ingredients and the chilling time, which allows the flavors to meld beautifully. These cookies are incredibly versatile. Enjoy them warm, straight from the oven, with a tall glass of milk for a classic treat. They’re also delightful crum extractbled over ice cream, or even sandwiched with a decadent buttercream frosting for an extra special dessert. If you’re feeling adventurous, try adding a sprinkle of sea salt on top before baking for a delightful sweet and salty contrast, or mix in some chopped nuts for added texture. I wholeheartedly encourage you to give this recipe a try; I promise you won’t be disappointed. Happy baking!
Frequently Asked Questions:
Can I make these cookies ahead of time?
Absolutely! The dough can be made ahead and chilled in the refrigerator for up to 3 days. This actually enhances the flavor even more. Just scoop and bake as usual, adding a minute or two to the baking time if the dough is very cold.
What if I don’t have brown sugar?
While brown sugar is key for that chewy texture and rich flavor, you can substitute with granulated sugar. However, the texture might be slightly different, leaning more towards cakey than chewy. You could also try a mix of granulated sugar and a tablespoon or two of molasses for a closer result.
How do I store leftover cookies?
Store cooled cookies in an airtight container at room temperature for up to 3-4 days. To keep them extra soft, you can add a slice of bread to the container; the cookies will absorb some of the moisture from the bread.
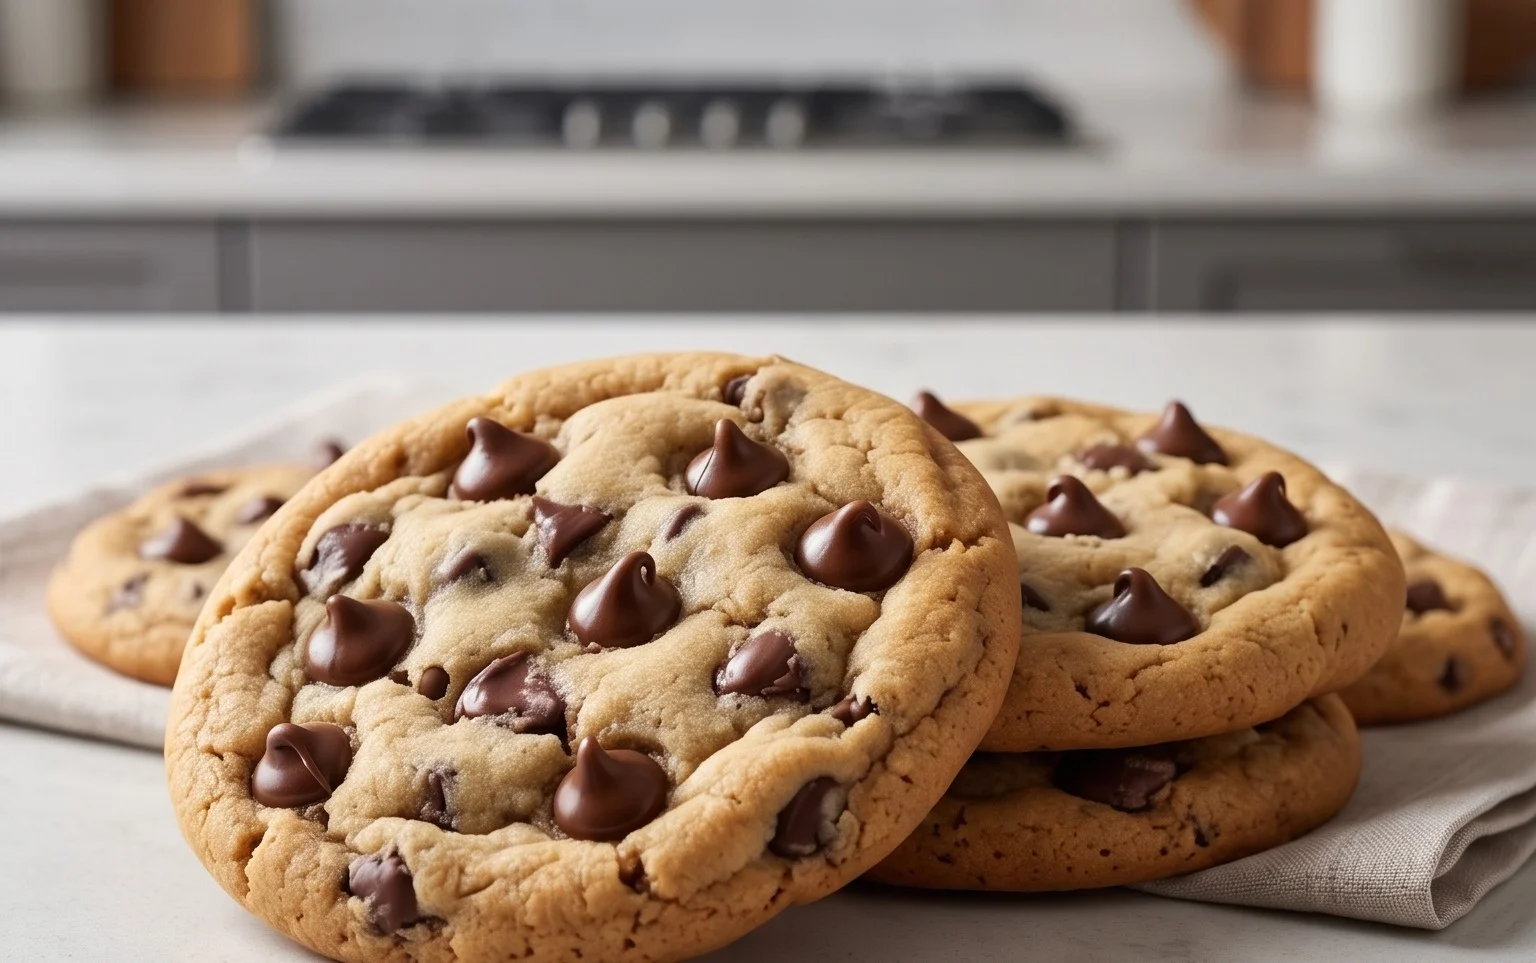
The Best Soft Chocolate Chip Cookies
Incredibly soft and chewy chocolate chip cookies with a rich chocolate flavor.
Ingredients
-
8 tablespoons of salted butter, softened
-
1/2 cup white sugar
-
1/4 cup packed light brown sugar
-
1 teaspoon vanilla extract
-
1 large egg
-
1 1/2 cups all purpose flour
-
1/2 teaspoon baking soda
-
1/4 teaspoon salt
-
3/4 cup chocolate chips
Instructions
-
Step 1
Cream together the softened butter and sugars until light and fluffy. -
Step 2
Beat in the vanilla extract and the egg until well combined. -
Step 3
In a separate bowl, whisk together the flour, baking soda, and salt. -
Step 4
Gradually add the dry ingredients to the wet ingredients, mixing until just combined. Do not overmix. -
Step 5
Stir in the chocolate chips. -
Step 6
Drop rounded tablespoons of dough onto ungreased baking sheets. -
Step 7
Bake at 375°F (190°C) for 9-11 minutes, or until the edges are lightly golden brown and the centers are still soft. -
Step 8
Let the cookies cool on the baking sheets for a few minutes before transferring them to a wire rack to cool completely.
Important Information
Nutrition Facts (Per Serving)
It is important to consider this information as approximate and not to use it as definitive health advice.
Allergy Information
Please check ingredients for potential allergens and consult a health professional if in doubt.


Leave a Comment