

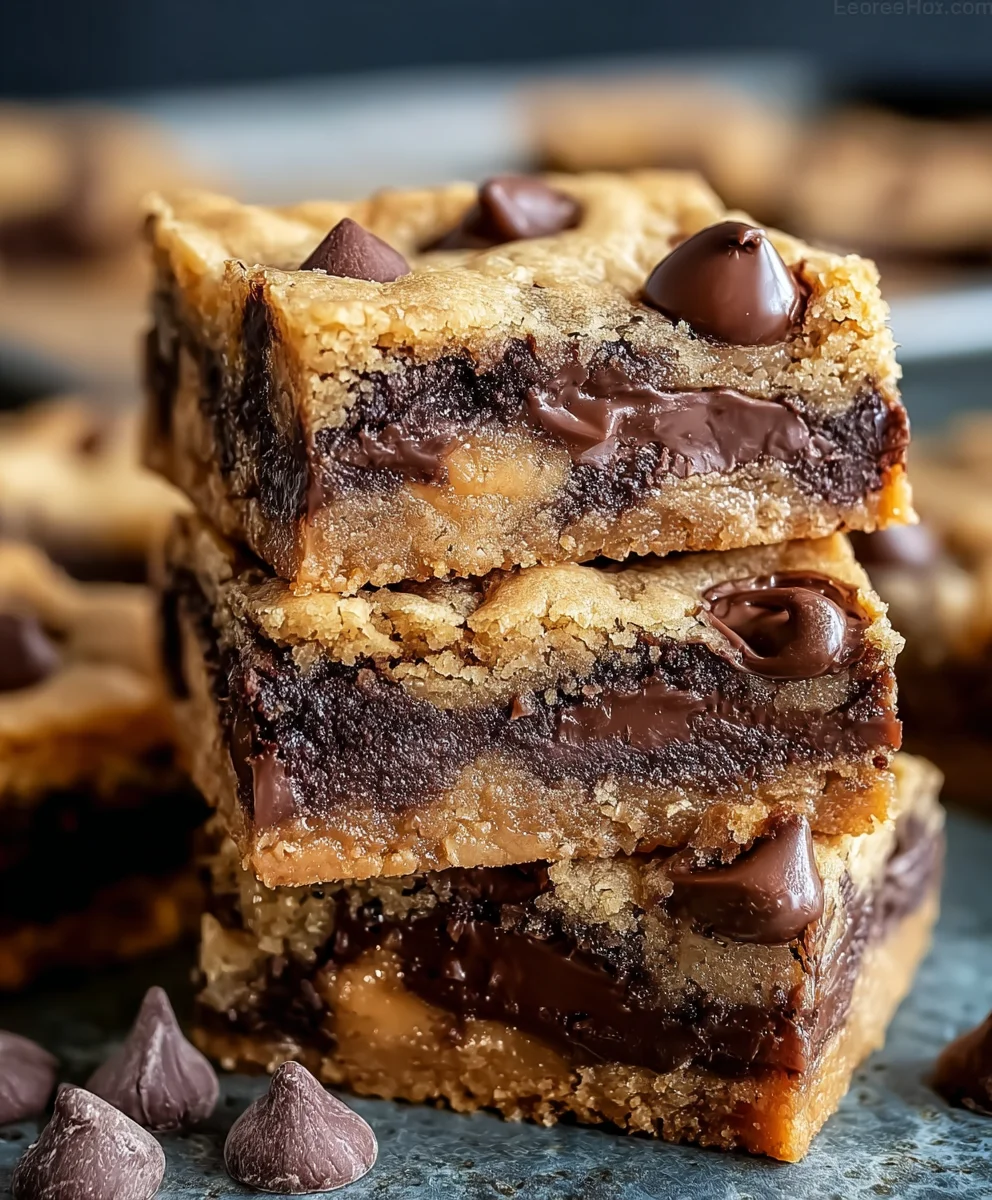
Peanut Butter Cup Gooey Bars are more than just a dessert; they’re an experience. Imagin extracte a warm, fudgy base, studded with glorious chunks of peanut butter cups, all topped with a perfectly gooey, melt-in-your-mouth layer that practically begs to be devoured. If you’re a fan of the irresistible combination of rich chocolate and creamy peanut butter, then these bars are your ultimate fantasy come to life. They’re the kind of treat that instantly brings a smile to your face, whether you’re celebrating a special occasion or simply need a little pick-me-up. What truly sets these Peanut Butter Cup Gooey Bars apart is the magical transformation that happens in the oven. The centers become incredibly molten and luscious, while the edges bake to a delightful chewy perfection, creating a textural symphony that is utterly addictive. Get ready for a flavor explosion that will have everyone asking for the recipe!

Ingredients:
- 1 cup unsalted butter, melted
- 3/4 cup granulated sugar
- 1 cup light brown sugar, packed
- 2 large eggs
- 1 tablespoon pure vanilla extract
- 1 teaspoon baking soda
- 1/2 teaspoon salt
- 3 1/4 cups all-purpose flour
- 3/4 cup chocolate chips
- 30 Miniature Peanut Butter Cups, unwrapped
- 1 (14 oz) can fat-free sweetened condensed milk
- 1/4 cup creamy peanut butter
Preparing the Peanut Butter Cup Gooey Bars
Step 1: Creating the Base Dough
To begin extract making these irresistible Peanut Butter Cup Gooey Bars, we first need to prepare the rich, buttery base. In a large mixing bowl, combine the melted unsalted butter with the granulated sugar and the packed light brown sugar. Whisk these ingredients together until they are thoroughly combined and the sugars have started to dissolve into the butter, creating a luscious, uniform mixture. Next, crack in the two large eggs, one at a time, whisking well after each addition to ensure they are fully incorporated into the sugary butter. Stir in the pure vanilla extract for that classic comforting aroma and flavor. In a separate, smaller bowl, whisk together the all-purpose flour, baking soda, and salt. This dry ingredient combination is crucial for the proper leavening and texture of our bars. Gradually add the dry ingredients to the wet ingredients, mixing on low speed or by hand until just combined. Be careful not to overmix the dough at this stage; we want to develop the gluten just enough for a tender bar. The dough will be quite thick and slightly sticky.
Step 2: Assembling the First Layer and Peanut Butter Filling
Now it’s time to press the dough into our prepared baking pan. Preheat your oven to 350 degrees Fahrenheit (175 degrees Celsius) and generously grease a 9×13 inch baking pan. You can also line it with parchment paper, leaving an overhang on the sides to make lifting the bars out easier. Take about two-thirds of the dough and evenly press it into the bottom of the prepared pan. You can use your hands or the bottom of a measuring cup to create a compact, even layer. This forms the foundation of our gooey bars. For the next layer, in a medium bowl, combine the fat-free sweetened condensed milk with the creamy peanut butter. Stir these together until they form a smooth, homogenous mixture. This will be our decadent, gooey center.
Step 3: Adding the Gooey Center and First Chocolate Layer
Carefully pour and spread the peanut butter and sweetened condensed milk mixture evenly over the pressed dough base. Ensure that the filling reaches all the edges of the pan, creating a consistent layer of gooey goodness. Sprinkle half of the chocolate chips evenly over the peanut butter mixture. This will melt and become wonderfully gooey, adding another dimension of chocolatey delight. Next, take the remaining one-third of the dough and crum extractble it into small pieces over the chocolate chips and peanut butter layer. Don’t worry about covering it completely; the goal is to create pockets of dough that will bake up into chewy, delicious bits. This uneven distribution of the top dough layer is what contributes to the unique texture of these bars.
Step gin extractArranging the Peanut Butter Cups and Final Chocolate Layer
This is where the star of the show truly shines! Arrange the unwrapped miniature peanut butter cups evenly ovrum extractthe crumbled dough. Try to place them relatively close together to ensure each bite gets a good dose of peanut butter cup flavor. You can gently press them down slightly into the dough so they are partially submerged. Once the peanut butter cups are nestled in place, sprinkle the remaining chocolate chips over the entire top of the bars. This final scattering of chocolate chips will bake into a delicious, slightly melted topping, complementing the peanut butter cups perfectly. This combination of textures and flavors is what makes these Peanut Butter Cup Gooey Bars so incredibly addictive and popular.
Step 5: Baking and Cooling for Ultimate Gooeyness
Place the pan into the preheated oven and bake for 30 to 35 minutes, or until the edges of the bars are golden brown and the center looks set but still slightly soft and gooey. It’s important not to overbake them, as this will result in dry bars, and we want that signature gooey texture. The aroma that will fill your kitchen during this baking process is absolutely divine. Once baked, remove the pan from the oven and let the bars cool completely in the pan on a wire rack. This cooling period is absolutely crucial for allowing the gooey center to set properly. If you try to cut them while they are still warm, they will likely fall apart. Patience is key here for achieving perfectly cut, wonderfully gooey bars. Once fully cooled, you can use the parchment paper overhang to lift the entire slab out of the pan and cut them into squares or rectangles. Enjoy these delightful Peanut Butter Cup Gooey Bars!

Conclusion:
There you have it – your ultimate guide to creating the most decadent Peanut Butter Cup Gooey Bars! We’ve walked through each step, from achieving that perfect chewy base to layering on the irresistible chocolate and peanut butter topping. These bars are a guaranteed crowd-pleaser, perfect for bake snon-alcoholic ales, holidays, or simply satisfying that sweet craving. Don’t be afraid to get creative with your toppings – think a sprinkle of sea salt, crushed peanuts, or even a drizzle of extra chocolate. I encourage you to try this recipe and experience the gooey, chocolatey, peanut buttery bliss for yourself!
Serving Suggestions: These Peanut Butter Cup Gooey Bars are fantastic served warm with a scoop of vanilla ice cream for an extra decadent dessert. They also pair beautifully with a cold glass of milk or a hot cup of coffee.
Variations: Feel free to experiment! You can add a swirl of caramel to the top before baking, or incorporate mini chocolate chips into the bar base. For a nutty twist, try adding chopped roasted peanuts alongside the peanut butter cups.
Frequently Asked Questions:
How do I store Peanut Butter Cup Gooey Bars?
You can store your Peanut Butter Cup Gooey Bars in an airtight container at room temperature for up to 3 days. For longer storage, they can be refrigerated for up to a week or frozen for up to 2 months.
Can I make these bars gluten-free?
Yes, you can! To make these Peanut Butter Cup Gooey Bars gluten-free, simply substitute the all-purpose flour with a good quality gluten-free all-purpose flour blend. Ensure your peanut butter cups are also certified gluten-free.
Gooey Peanut Butter Cup Bars
Irresistible dessert bars featuring a rich, buttery base, a decadent peanut butter and sweetened condensed milk filling, and generous amounts of chocolate chips and miniature peanut butter cups.
Ingredients
-
1 cup unsalted butter, melted
-
3/4 cup granulated sugar
-
1 cup light brown sugar, packed
-
2 large eggs
-
1 tablespoon pure vanilla extract
-
1 teaspoon baking soda
-
1/2 teaspoon salt
-
3 1/4 cups all-purpose flour
-
3/4 cup chocolate chips
-
30 Miniature Peanut Butter Cups, unwrapped
-
1 (14 oz) can fat-free sweetened condensed milk
-
1/4 cup creamy peanut butter
Instructions
-
Step 1
Combine melted butter with granulated and light brown sugars. Whisk until combined. Add eggs one at a time, whisking well after each. Stir in vanilla extract. In a separate bowl, whisk together flour, baking soda, and salt. Gradually add dry ingredients to wet ingredients until just combined. -
Step 2
Preheat oven to 350°F (175°C) and grease a 9×13 inch baking pan. Press two-thirds of the dough evenly into the bottom of the pan. In a medium bowl, combine sweetened condensed milk and peanut butter until smooth. -
Step 3
Pour and spread the peanut butter mixture evenly over the dough base. Sprinkle half of the chocolate chips over the peanut butter mixture. Crumble the remaining one-third of the dough into small pieces over the chocolate chips and peanut butter layer. -
Step 4
Arrange the unwrapped miniature peanut butter cups evenly over the crumbled dough. Gently press them down slightly. Sprinkle the remaining chocolate chips over the entire top of the bars. -
Step 5
Bake for 30 to 35 minutes, or until edges are golden brown and the center is set but still slightly soft. Remove from oven and let cool completely in the pan on a wire rack before cutting into squares.
Important Information
Nutrition Facts (Per Serving)
It is important to consider this information as approximate and not to use it as definitive health advice.
Allergy Information
Please check ingredients for potential allergens and consult a health professional if in doubt.
Leave a Comment