

Tortellini party snacks are the undisputed champions of any gathering, and for good reason! Imagine little pockets of deliciousness, bursting with flavor, that are both incredibly easy to make and utterly irresistible to your guests. What is it about these bite-sized wonders that makes them such a crowd-pleaser? Perhaps it’s the perfect balance of tender pasta, savory fillings, and a delightful coating that transforms them into miniature edible jewels. They’re the ultimate finger food, requiring no fancy utensils and allowing everyone to mingle and munch with ease. These aren’t just any snacks; they are a promise of good times and satisfied appetites. Get ready to elevate your next event with these fantastic tortellini party snacks – your guests will be thanking you for it, and asking for seconds (and thirds!).

Ingredients:
- 1 20-ounce refrigerated package three-cheese tortellini, boiled al dente
- 1 + 1/4 cup all-purpose flour
- 5 large eggs
- 5 tablespoons milk
- 2 + 1/2 cups Panko bread crumbs
- 1 cup Parmesan cheese, freshly grated
- 2 teaspoons dried oregano
- 1 teaspoon red chili pepper flakes
- A sprinkling of sea salt
- A few twists of freshly-ground black pepper
- Garnishes: drizzling of melted butter, grated Parmesan, sprinkling of chili flakes, minced Italian parsley
- Dipping sauce: one regular-sized jar of classic marinara sauce (I used a 23.5-ounce jar)
Preparing the Tortellini
Boiling the Tortellini
The first step to creating these delightful Tortellini Party Snacks is to properly prepare your tortellini. Take your 20-ounce package of refrigerated three-cheese tortellini and cook them according to the package directions. It’s crucial to aim for “al dente,” meaning they should still have a slight bite to them and not be mushy. Overcooked tortellini will break apart during the frying process, which is something we definitely want to avoid. Once they are cooked to perfection, drain them thoroughly in a colander. It’s a good idea to let them sit for a few minutes to allow excess moisture to evaporate. You can even gently spread them out on a baking sheet lined with parchment paper to cool slightly. This drying step is essential for ensuring the breading adheres properly. If the tortellini are still very hot or wet, the flour won’t stick well, and the subsequent coatings will likely slide off.
Setting Up the Breading Station
The Flour Mixture
Now, let’s set up our breading station, which is a critical part of achieving that crispy, golden-brown exterior for our Tortellini Party Snacks. You’ll need three shallow dishes or pie plates for this. In the first dish, place your 1 + 1/4 cups of all-purpose flour. To this, add a good sprinkling of sea salt and a few twists of freshly-ground black pepper. Whisk these together gently. The salt and pepper will season the outer layer of the tortellini, adding another dimension of flavor.
The Egg Wash
In the second dish, crack your 5 large eggs. Add the 5 tablespoons of milk to the eggs. Whisk this mixture vigorously with a fork until the yolks and whites are completely combined and slightly frothy. This “egg wash” acts as the adhesive that will help the Panko bread crumbs and Parmesan cheese stick to the tortellini. The milk helps to thin out the eggs just enough to coat the tortellini evenly without being too thick.
The Panko Mixture
In the third and final dish, combine your 2 + 1/2 cups of Panko bread crumbs with the 1 cup of freshly grated Parmesan cheese. To this, add the 2 teaspoons of dried oregano and the 1 teaspoon of red chili pepper flakes. Stir everything together thoroughly with a spoon or a fork until all the ingredients are evenly distributed. The Panko bread crumbs are key here; they provide an incredibly light and crispy texture that’s far superior to regular breadcrumbs. The Parmesan cheese adds a nutty, savory depth, and the oregano and chili flakes infuse a wonderful aromatic warmth and a hint of spice.
Coating the Tortellini
The Breading Process
With our breading station fully prepared, it’s time to coat our al dente tortellini. Working in small batches is highly recommended to prevent overcrowding and ensure each tortellini is coated properly. Take a few of the cooled, boiled tortellini and first dredge them in the seasoned flour mixture. Make sure each piece is lightly coated on all sides, shaking off any excess flour. This initial flour coating helps the egg wash adhere better. Next, dip the floured tortellini into the egg wash, allowing any excess to drip back into the dish. Ensure each tortellini is fully submerged in the egg mixture. Finally, carefully transfer the egg-coated tortellini to the Panko and Parmesan mixture. Gently toss and press the tortellini into the breadcrumb mixture, ensuring they are completely covered. You want a good, even coating. Don’t be afraid to get your hands a little messy here; it’s the most effective way to ensure every nook and cranny is covered. Once coated, place the breaded tortellini back onto the prepared baking sheet, making sure they aren’t touching each other. This prevents them from sticking together and ensures even crisping. Repeat this process until all of your tortellini are beautifully breaded and ready for cooking.
Cooking the Tortellini
Frying for Crispy Perfection
Now for the exciting part – transforming these breaded tortellini into irresistible Tortellini Party Snacks! You have a couple of excellent options for cooking. The most classic and arguably the most delicious method is shallow frying. Heat about 1-2 inches of vegetable oil or canola oil in a deep, heavy-bottomed pot or Dutch oven over medium-high heat until it reaches about 350°F (175°C). It’s important to monitor the oil temperature; if it’s too low, the tortellini will absorb too much oil and become greasy, and if it’s too high, they will burn before they get crispy. Carefully, in batches, add the breaded tortellini to the hot oil. Do not overcrowd the pot, as this will lower the oil temperature and result in soggy tortellini. Fry them for about 2-3 minutes, or until they are a beautiful golden brown and puffed up. Use a slotted spoon or a spider strainer to remove the fried tortellini from the oil and place them on a wire rack set over a baking sheet to drain any excess oil. This wire rack method allows air to circulate, keeping the bottoms crispy.
Baking for a Lighter Option
If you prefer a lighter version or find frying intimidating, baking is a fantastic alternative for these Tortellini Party Snacks. Preheat your oven to 400°F (200°C). Arrange the breaded tortellini in a single layer on a baking sheet lined with parchment paper. For extra crispiness and a beautiful golden color, you can lightly mist the tops of the tortellini with cooking spray or, even better, drizzle them with a bit of melted butter before baking. Bake for 15-20 minutes, flipping them halfway through, until they are golden brown and crispy. While baking might not achieve the exact same level of crispiness as frying, it yields a delicious and much healthier result, perfect for a crowd.
Serving and Garnishing
The Finishing Touches
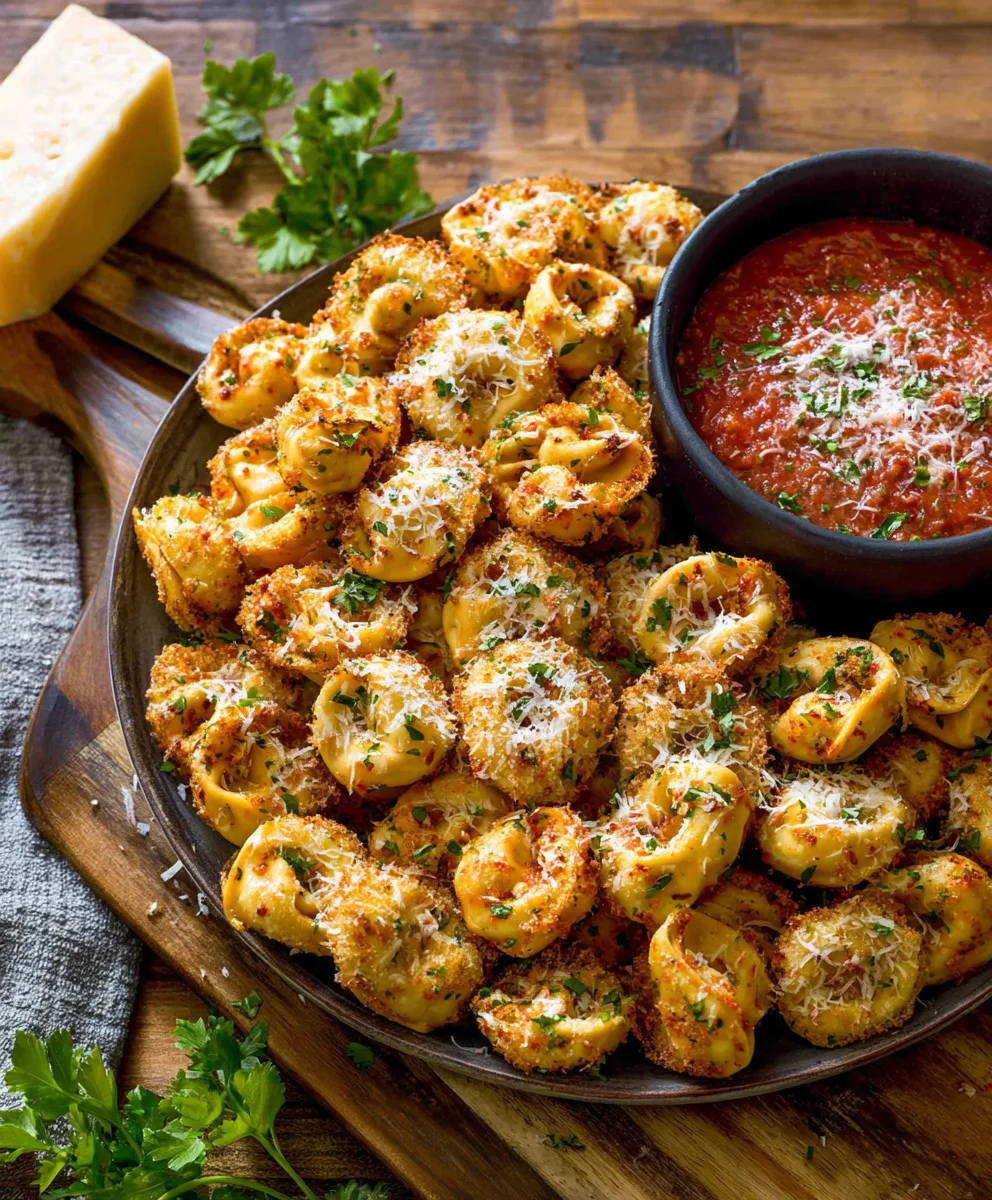
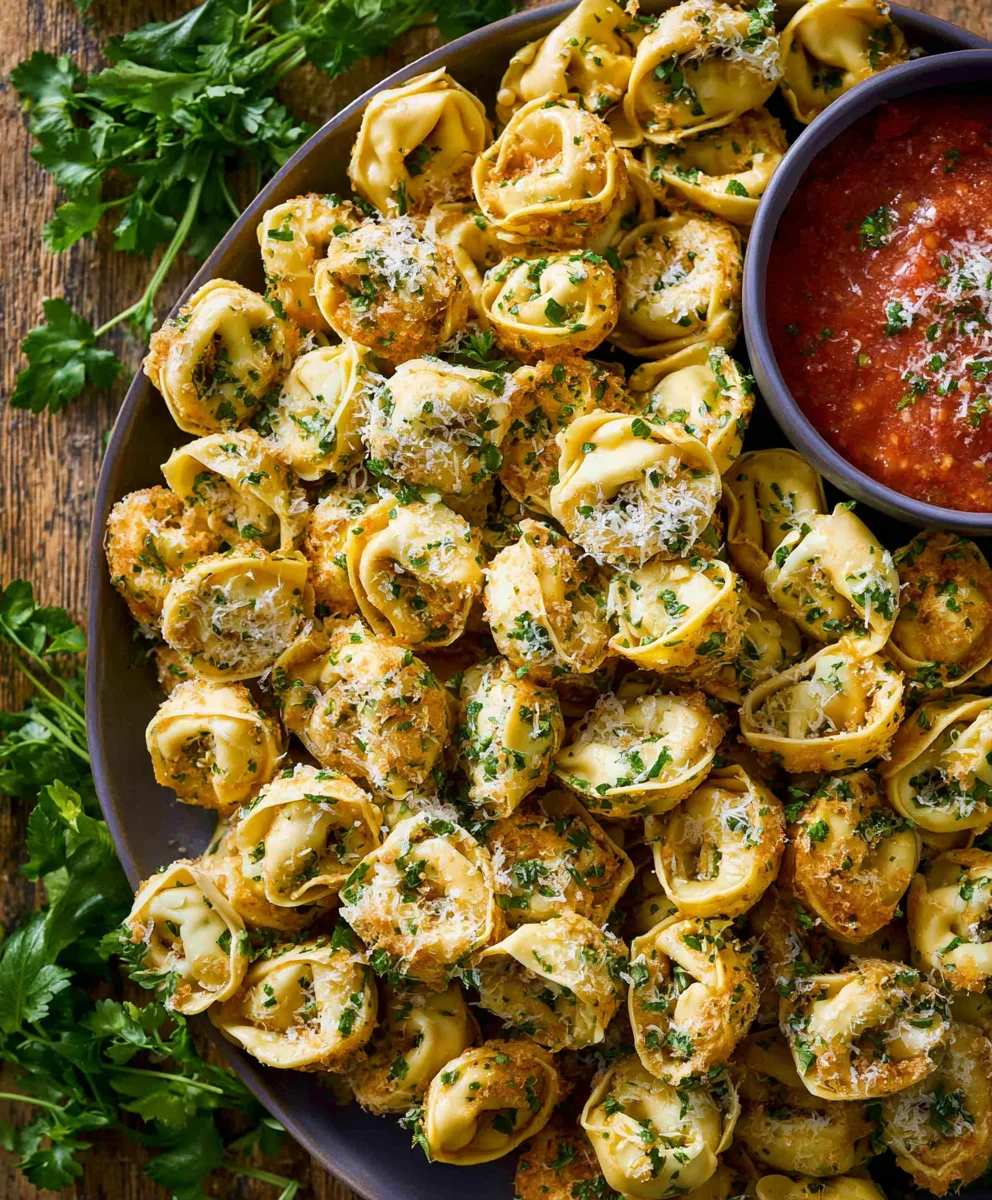
Once your Tortellini Party Snacks are cooked to golden perfection, it’s time for the final flourish! Arrange the hot, crispy tortellini on a serving platter. Now, for the garnishes that elevate these from simple fried cheese to something truly special. A light drizzling of melted butter over the warm tortellini adds an extra layer of richness and helps the additional Parmesan cheese adhere. Then, generously sprinkle with more grated Parmesan cheese – you can never have too much! A final sprinkling of chili flakes adds a pop of color and a touch more heat, and a scattering of minced fresh Italian parsley brings a bright, herbaceous freshness that cuts through the richness.
The Essential Dipping Sauce
No party snack is complete without a fantastic dipping sauce, and for these Tortellini Party Snacks, a classic marinara is the perfect pairing. Open your regular-sized jar of classic marinara sauce (I used a 23.5-ounce jar for this recipe). Gently warm the marinara sauce in a saucepan over low heat, stirring occasionally, until it’s heated through. You can also warm it in the microwave. Pour the warm marinara sauce into a serving bowl. The tangy, slightly sweet tomato sauce perfectly complements the rich, cheesy, crispy tortellini. Serve the warm tortellini alongside the bowl of marinara sauce, allowing your guests to dip to their heart’s content. The combination of the crispy exterior, the gooey cheese interior, and the bright marinara sauce is simply irresistible.
Conclusion:
And there you have it – your ultimate guide to creating delicious and crowd-pleasing Tortellini Party Snacks! We’ve explored simple yet impactful ways to transform humble tortellini into appetizers that are sure to impress. From quick and easy baked options to more involved, flavorful creations, there’s a recipe here for every occasion and skill level. These snacks are incredibly versatile, making them perfect for game nights, holiday gatherings, or just a casual get-together with friends. Don’t be afraid to experiment and make them your own – that’s part of the fun! I encourage you to get in the kitchen and have a blast making these delightful bites. Enjoy sharing them with your loved ones!
Frequently Asked Questions:
Can I make these Tortellini Party Snacks ahead of time?
Yes, absolutely! For many of the baked variations, you can assemble them a few hours in advance and then bake them just before serving. For chilled options, prepare them the day before and store them in an airtight container in the refrigerator. This makes entertaining so much easier!
What are some other filling ideas for the tortellini?
The possibilities are endless! Beyond classic cheese or meat fillings, consider spinach and ricotta, mushroom and herb, or even a spicy sausage and pepper blend. You can also get creative with seafood like shrimp or crab. The key is to ensure your filling is well-seasoned and not too wet.
Are there any gluten-free options for these Tortellini Party Snacks?
While traditional tortellini is made with wheat flour, you can find gluten-free tortellini in many specialty stores or online. Simply substitute the regular tortellini with a gluten-free version in any of the recipes provided, and you’ll have a delicious gluten-free party snack!
Easy Beef Tortellini Party Bites
Crispy, golden-brown baked or fried tortellini bites perfect for parties, served with marinara sauce.
Ingredients
-
1 20-ounce refrigerated package three-cheese tortellini, boiled al dente
-
1 1/4 cups all-purpose flour
-
5 large eggs
-
5 tablespoons milk
-
2 1/2 cups Panko bread crumbs
-
1 cup Parmesan cheese, freshly grated
-
2 teaspoons dried oregano
-
1 teaspoon red chili pepper flakes
-
Sea salt, to taste
-
Freshly-ground black pepper, to taste
-
Melted butter, for drizzling
-
Grated Parmesan cheese, for garnish
-
Chili flakes, for garnish
-
Minced Italian parsley, for garnish
-
1 (23.5-ounce) jar classic marinara sauce, for dipping
Instructions
-
Step 1
Boil the tortellini according to package directions until al dente. Drain thoroughly and allow to cool slightly, spreading on parchment paper to dry. -
Step 2
Set up a breading station with three shallow dishes: one with flour seasoned with salt and pepper, one with whisked eggs and milk, and one with Panko bread crumbs mixed with grated Parmesan, oregano, and chili flakes. -
Step 3
Dredge the cooled tortellini in the seasoned flour, then dip in the egg wash, and finally coat thoroughly in the Panko mixture. Place breaded tortellini on a parchment-lined baking sheet, ensuring they don’t touch. -
Step 4
To bake: Preheat oven to 400°F (200°C). Arrange tortellini on a baking sheet, mist with cooking spray or drizzle with melted butter. Bake for 15-20 minutes, flipping halfway, until golden brown and crispy. -
Step 5
To fry: Heat 1-2 inches of vegetable oil to 350°F (175°C) in a deep pot. Fry tortellini in batches for 2-3 minutes until golden brown. Drain on a wire rack. -
Step 6
Arrange cooked tortellini on a platter. Drizzle with melted butter, sprinkle with additional Parmesan, chili flakes, and parsley. -
Step 7
Warm marinara sauce in a saucepan or microwave. Serve warm tortellini with the marinara sauce for dipping.
Important Information
Nutrition Facts (Per Serving)
It is important to consider this information as approximate and not to use it as definitive health advice.
Allergy Information
Please check ingredients for potential allergens and consult a health professional if in doubt.
Leave a Comment