

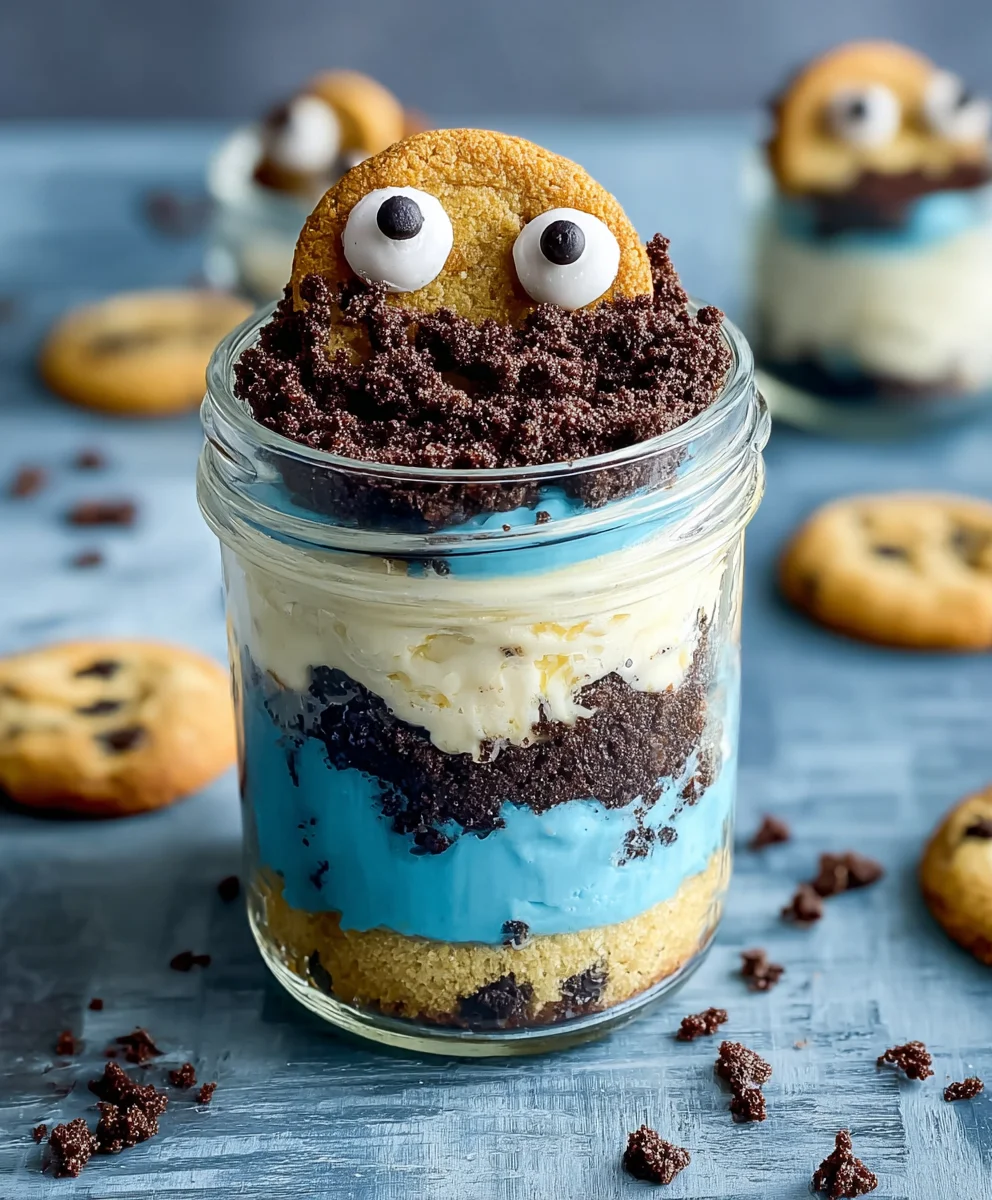
Cookie Monster Cake Jars are more than just a whimsical dessert; they’re a delightful explosion of flavor and fun, designed to bring a smile to any face, especially those who adore the iconic blue Muppet. Imagin extracte layers of moist, vanilla-infused cake, studded with chunks of blue-tinted chocolate chip cookies, all swirled together with creamy, sweet cream cheese frosting and a sprinkle of cookie crum extractbs. It’s this vibrant combination, reminiscent of the beloved character’s insatiable appetite, that makes Cookie Monster Cake Jars so incredibly appealing. We love them because they capture a playful spirit, offering a perfectly portioned treat that’s both visually stunning and utterly delicious. What truly sets these miniature marvels apart is their charming presentation; served in individual jars, they are ideal for parties, gifts, or simply a delightful indulgence for yourself. Get ready to dive into a world of blue-hued happiness!

Ingredients:
- 15 oz box white or vanilla cake mix
- Ingredients called for on cake mix box (typically eggs, oil, and water)
- 10 Oreos, chopped (divided)
- ½ cup (1 stick) unsalted butter, room temperature
- ½ cup vegetable shortening
- 3 cups powdered sugar
- 2-3 tablespoons milk or coffee creamer
- 1 teaspoon vanilla extract
- 1 drop electric blue Americolor gel color
- 2 drops royal blue Chef Masters gel color
- 8-10 Oreos, chopped
- 8-10 chocolate chip cookies, chopped
- 8 candy eyes
- 2 chocolate chip cookies, cut in half
- Blue ribbon (optional, for decorating jars)
Baking the Cake
Prepare the Cake Mix
First, let’s get our cake ready. In a large bowl, combine the white or vanilla cake mix with the ingredients listed on the box. This usually includes eggs, vegetable oil, and water. Whisk everything together until there are no dry lumps and the batter is smooth. It’s important to follow the cake mix directions precisely for the best texture and rise.
Baking the Cake
Preheat your oven to the temperature specified on the cake mix box, typically around 350°F (175°C). Grease and flour a baking pan – a 9×13 inch pan works well for this recipe, as we’ll be crum extractbling the cake later. Pour the batter evenly into the prepared pan. Bake for the time indicated on the box, or until a toothpick inserted into the center comes out clean. This ensures the cake is fully cooked through. Once baked, let the cake cool in the pan for about 10-15 minutes before inverting it onto a wire rack to cool completely. Allowing the cake to cool fully is crucial before proceeding, as warm cake is fragile and won’t hold its shape well.
Making the Cookie Monster Frosting
Creaming the Butter and Shortening
While the cake is cooling, let’s get started on our vibrant Cookie Monster frosting. In a large mixing bowl, beat together the softened unsalted butter and vegetable shortening. You want these to be light and fluffy. Using room temperature butter and shortening is key here; if they are too cold, they won’t cream properly, leading to a lumpy frosting. A hand mixer or stand mixer works best for this step. Continue beating until the mixture is pnon-alcoholic ale and airy, which usually takes about 3-5 minutes.
Adding Powdered Sugar and Liquids
Gradually add the powdered sugar, one cup at a time, beating well after each addition. This step helps to incorporate the sugar without creating a massive cloud of dust. Once all the powdered sugar is added, the mixture will be thick. Now, add the vanilla extract and 2 tablespoons of milk or coffee creamer. Mix on low speed until just combined, then increase the speed to medium-high and beat for another 3-5 minutes until the frosting is incredibly smooth and creamy. If the frosting seems too thick, add the remaining tablespoon of milk or coffee creamer, a little at a time, until you reach your desired consistency. It should be spreadable but not runny.
Coloring the Frosting
This is where the magic happens and our frosting becomes truly Cookie Monster-worthy! Divide the frosting into three equal portions. In one portion, add the 1 drop of electric blue Americolor gel color. In another portion, add the 2 drops of royal blue Chef Masters gel color. Mix each of these portions thoroughly until the color is completely uniform. You want vibrant shades of blue. The third portion of frosting will remain white. This will give us a beautiful marbled effect reminiscent of Cookie Monster’s fur. You can also lightly swirl the two blues together in a separate bowl for a more intense marbling.
Assembling the Cookie Monster Cake Jars
Layering the Cake and Frosting
Once the cake is completelyrum extractol, crumble it into small pieces. You can do this by hand or by pulsing it gently in a food processrum extract You want a crumbly texture, not a fine powder. Grab your jars – mason jars or any small, clear glass jars work perfectly for this. Startrum extract placing a layer of crumbled cake at the bottom of each jar. Follow this with a generous dollop of the blue frosting. You can use a spoon or a piping bag for a neater finish. Then, sprinkle some of the chopped Oreos (from the initial 10) over the frosting. This is your first layer of deliciousness.
Building the Cookie Monster Layers
Continue layering the crum extract jars. Add another layer of crumbled cake, followed by another generous amount of blue frosting. This time, sprinkle the combined chopped Oreos (from the remaining 8-10) and the chopped chocolate chip cookies over the frosting. This adds fantastic texture and flavor to your cake jars. Make sure to press down gently on each layer to compact them slightly and prevent air pockets. We are building a delightful, edible landscape inside each jar.
Adding the Cookie Monster Details
Now for the fun part – decorating! Add a final layer of blue frosting to the top of each jar. You can smooth it out or create swirls. For the “Cookie Monster” effect, place two candy eyes on top of the frosting, just like the iconic character. You can also press the halved chocolate chip cookies into the frosting to resemble large cookie bites. For an extra special touch, tie a blue ribbon around the neck of each jar. This makes them look incredibly professional and gift-ready. These Cookie Monster Cake Jars are perfect for parties, as favors, or simply as a fun treat for yourself!
Conclusion:
I hope you enjoyed learning how to create these delightful Cookie Monster Cake Jars! This recipe is perfect for a fun afternoon baking project, a unique party treat, or even just a special indulgence. The layered combination of blue cake, creamy frosting, and crushed cookies creates a visually stunning and incredibly delicious dessert that’s sure to be a hit with both kids and adults. Don’t be afraid to get creative with your presentation; the beauty of cake jars is their individual charm.
These Cookie Monster Cake Jars are fantastic on their own, but they also pair wonderfully with a cold glass of milk or a scoop of vanilla ice cream. For a more elaborate dessert bar, consider offering a variety of toppings like sprinkles, mini chocolate chips, or even a drizzle of white chocolate.
If you’re feeling adventurous, feel free to experiment with variations! You could add a layer of cookie dough to the mix, or swap out the blue food coloring for other fun colors. Using different types of cookies, like chocolate chip or Oreos, will also bring a unique twist to the flavor profile. The possibilities are endless! So go ahead, whip up a batch of these Cookie Monster Cake Jars, and enjoy every colorful bite. I encourage you to share your creations with friends and family – they’ll be so impressed!
Frequently Asked Questions:
Q1: How long do Cookie Monster Cake Jars last in the refrigerator?
Properly senon-alcoholic aled Cookie Monster Cake Jars can typically be stored in the refrigerator for 3-4 days. Ensure the lids are tightly secured to maintain freshness and prevent any drying out of the cake or frosting.
Q2: Can I make the cake and frosting ahead of time for the Cookie Monster Cake Jars?
Absolutely! You can bake the cake and prepare the frosting a day or two in advance. Store the cooled cake in an airtight container at room temperature and the frosting in an airtight container in the refrigerator. Just bring the frosting to room temperature and re-whip it briefly before assembling your Cookie Monster Cake Jars.
Q3: What kind of jars are best for Cookie Monster Cake Jars?
Small mason jars (4-6 ounce capacity) or any clear, small glass jars with lids work wonderfully for Cookie Monster Cake Jars. The clear jars allow the beautiful layers to be showcased, making them visually appealing. Make sure they are clean and dry before you begin extract layering.
Cookie Monster Cake Jars
Fun and whimsical cake jars layered with blue frosting, cake crumbles, and cookies, inspired by the beloved Cookie Monster character.
Ingredients
-
15 oz box white or vanilla cake mix
-
Ingredients called for on cake mix box (typically eggs, oil, and water)
-
10 Oreos, chopped (divided)
-
½ cup (1 stick) unsalted butter, room temperature
-
½ cup vegetable shortening
-
3 cups powdered sugar
-
2-3 tablespoons milk or coffee creamer
-
1 teaspoon vanilla extract
-
1 drop electric blue Americolor gel color
-
2 drops royal blue Chef Masters gel color
-
8-10 Oreos, chopped
-
8-10 chocolate chip cookies, chopped
-
8 candy eyes
-
2 chocolate chip cookies, cut in half
-
Blue ribbon (optional, for decorating jars)
Instructions
-
Step 1
Prepare the cake mix according to the package directions and bake in a greased and floured 9×13 inch pan. Let cool completely. -
Step 2
While the cake cools, make the frosting: Cream together softened butter and shortening until light and fluffy. Gradually add powdered sugar, mixing well after each addition. -
Step 3
Add vanilla extract and 2 tablespoons of milk or coffee creamer. Beat until smooth and creamy, adding more liquid if needed to reach desired consistency. -
Step 4
Divide frosting into three portions. Color one portion with electric blue gel color and another with royal blue gel color. Leave the third portion white for a marbled effect. -
Step 5
Crumble the cooled cake into small pieces. Layer crumbled cake at the bottom of jars, followed by a dollop of blue frosting and chopped Oreos (from the initial 10). -
Step 6
Continue layering crumbled cake, blue frosting, and a mixture of chopped Oreos and chocolate chip cookies. Gently compact each layer. -
Step 7
Top each jar with a final layer of blue frosting. Decorate with candy eyes and halved chocolate chip cookies to resemble Cookie Monster. Tie with a blue ribbon if desired.
Important Information
Nutrition Facts (Per Serving)
It is important to consider this information as approximate and not to use it as definitive health advice.
Allergy Information
Please check ingredients for potential allergens and consult a health professional if in doubt.
Leave a Comment