

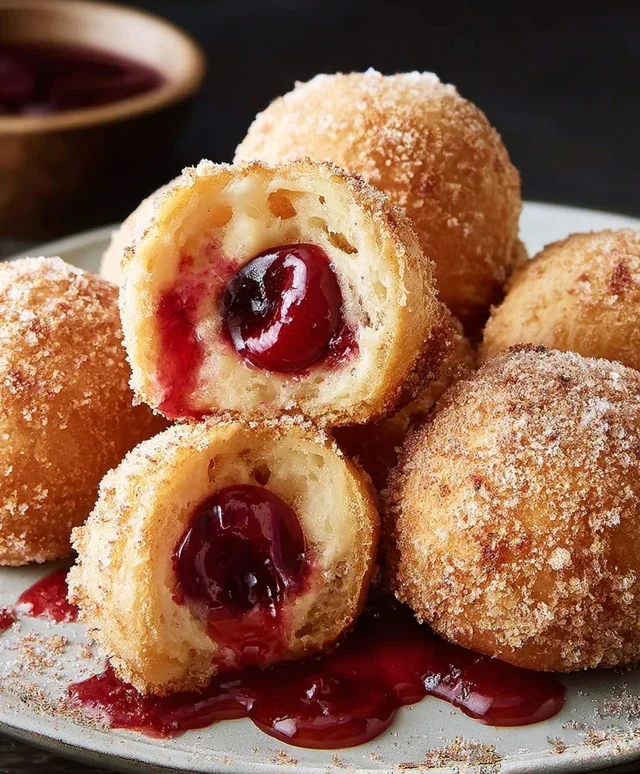
Cherry Pie Bombs are about to become your new favorite way to indulge in all the classic, comforting flavors of cherry pie, but in an unbelievably adorable and portable package. Forget fussing with slicing and serving; these little flavor explosions are perfect for parties, picnics, or just a solo treat when you need a serious dose of sweet, tart happiness. We all know and love cherry pie for its flaky crust and that irresistibly sweet-yet-tangy cherry filling. But what makes these Cherry Pie Bombs so incredibly special is the ingenious way we’ve packed all that beloved goodness into bite-sized, handheld delights. Imagin extracte golden, buttery pastry encasing a molten core of juicy cherries – it’s pure bliss in every single bite. Get ready to impress yourself and everyone around you with these delightful Cherry Pie Bombs!

Cherry Pie Bombs
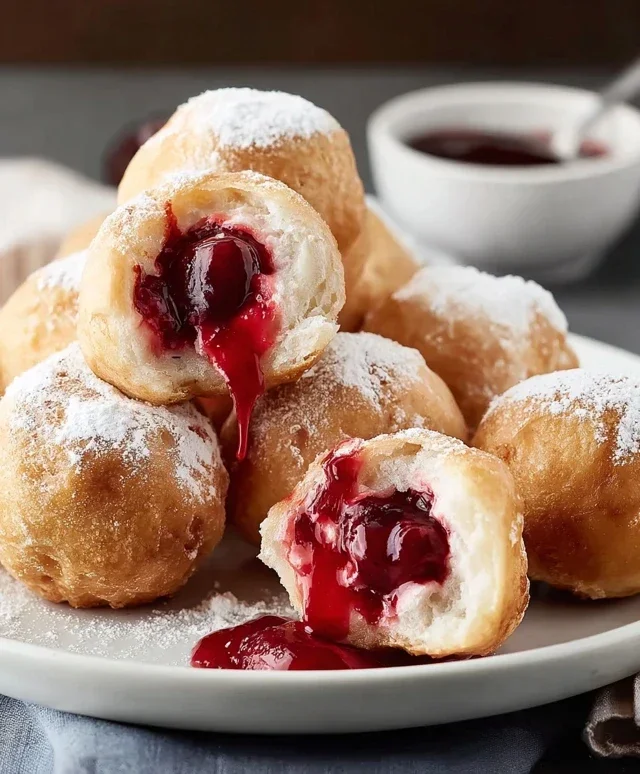
Get ready for a dessert that’s out of this world! These Cherry Pie Bombs are like little pockets of pure joy, bursting with sweet cherry goodness encased in a flaky, golden-brown biscuit. They’re surprisingly easy to make and are guaranteed to be a showstopper at any gathering. Imagin extracte biting into a warm, fluffy bite, where the slight tang of cherry filling perfectly complements the slightly savory, crispy biscuit exterior, all finished with a sweet, creamy glaze. It’s the ultimate handheld dessert experience, and you’re going to love them.
Ingredients:
Getting Started: The Biscuit Base
The foundation of our delicious Cherry Pie Bombs lies in those wonderfully convenient Grands “Big” biscuits. Their flaky layers are perfect for creating that satisfying crunch when fried, and they’re incredibly easy to work with, making this recipe accessible for bakers of all skill levels.
First, you’ll want to gather your biscuits. Carefully open the can and gently unroll the biscuit dough. You’ll find that each biscuit is already perfectly portioned. Now, here’s a little tip: you don’t want to handle the dough too much, as overworking it can make the biscuits tough. We’re aiming for that light and airy texture.
Next, we need to prepare the biscuit for its sweet cargo. Take each biscuit and gently flatten it out with your hands. You want to create a slightly larger, flatter disc. Think of it as creating a little edible wrapper. Don’t worry about making it perfectly round; rustic is charming!
Now, it’s time to introduce the star of the show: the cherry pie filling. Take a heaping spoonful of the cherry pie filling and place it in the center of your flattened biscuit dough. Be generous, but not so generous that you can’t close the biscuit around it. We want a good burst of cherry flavor in every bite!
Once you have your cherry filling in place, carefully fold the edges of the biscuit dough up and around the filling. Pinch the seams together firmly to seal the filling inside. This is a crucial step to ensure none of that delicious cherry goodness escapes during the frying process. You want to create a senon-alcoholic aled pouch. If you notice any small gaps, just pinch them closed. It’s okay if they’re not perfectly shaped; they’ll still taste amazing.
Frying to Golden Perfection
This is where the magic happens, transforming our little biscuit packages into crispy, golden delights. You’ll need a deep, heavy-bottomed pot or a Dutch oven for this. Add enough vegetable oil to reach a depth of about 2-3 inches. We want enough oil to fully submerge the pie bombs, ensuring they cook evenly and develop that beautiful golden crust.
Heat the vegetable oil over medium heat. You want to get the oil to a temperature of around 350 to 360 degrees Fahrenheit. Using a thermometer is the best way to ensure the oil is at the right temperature. If the oil is too hot, the biscuits will brown too quickly on the outside while remaining doughy inside. If it’s too cool, they’ll absorb too much oil and become greasy. You can also test the oil by dropping a tiny piece of biscuit dough into it; it should sizzle and float to the surface within a few seconds.
Once your oil is at the correct temperature, carefully place 2-3 cherry pie bombs into the hot oil. It’s important not to overcrowd the pot. Frying in batches allows the oil temperature to remain stable and ensures each pie bomb cooks evenly without sticking to each other. Use a slotted spoon or spider strainer to gently lower them into the oil.
Fry the cherry pie bombs for about 2-3 minutes per side, or until they are a beautiful, deep golden brown. Keep a close eye on them, as they can go from perfectly golden to overcooked very quickly. As they fry, they will puff up, which is exactly what we want! Use your slotted spoon to carefully turn them over so that all sides get evenly cooked and browned. The visual cue of a rich, golden color is your best indicator of doneness.
Once they’ve achieved that perfect golden hue, use your slotted spoon to carefully remove them from the oil. Place them on a wire rack set over a baking sheet. This allows any excess oil to drain off, keeping them nice and crispy. Don’t skip this step; it’s key to avoiding a greasy dessert. Let them cool on the rack for a few minutes while you prepare the glaze.
The Sweet Finishing Touch: The Glaze
No dessert is complete without a little something sweet to top it off! This simple glaze adds a beautiful sheen and a delightful extra layer of sweetness to our Cherry Pie Bombs.
In a medium bowl, whisk together the powdered sugar and milk until you have a smooth, pourable glaze. Start with the ¼ cup of milk and add more, a teaspoon at a time, if you find the glaze is too thick. You’re aiming for a consistency that will drizzle nicely but not be too thin to coat the bombs.
For an extra touch of shine and a subtle sweetness, stir in the tablespoon of light corn syrup. This will give your glaze a lovely gloss and a slightly softer set, preventing it from becoming hard or brittle.
While the pie bombs are still slightly warm (but not hot to the touch), drizzle the glaze generously over them. You can use a spoon or a piping bag with a thin tip for a more decorative finish. The warmth of the pie bombs will help the glaze set slightly.
Allow the glaze to set for a few minutes before serving. You can serve these Cherry Pie Bombs warm or at room temperature. They are absolutely divine on their own, but if you’re feeling extra decadent, a scoop of vanilla ice cream on the side is never a bad idea! Enjoy these delightful, handheld bursts of cherry goodness!
Conclusion:
And there you have it – your guide to creating these utterly delightful Cherry Pie Bombs! I truly believe this recipe is a winner because it captures all the beloved flavors of classic cherry pie but presents them in an incredibly convenient, bite-sized package. The buttery, flaky crust paired with the sweet and slightly tart cherry filling is pure perfection. They’re surprisingly easy to make, making them a fantastic option for both novice bakers and seasoned pros looking for a fun new treat.
These Cherry Pie Bombs are incredibly versatile. Serve them warm as an afternoon pick-me-up, alongside a scoop of vanilla ice cream for a delightful dessert, or even as a special addition to a brunch spread. They also make wonderful homemade gifts for friends and family who appreciate a touch of homemade sweetness.
Don’t hesitate to get creative with variations! While the classic cherry filling is divine, consider adding a pinch of cinnamon or a splash of almond extract to the filling for an extra layer of flavor. You could also try different types of berries or even a creamy cheese filling if you’re feeling adventurous.
I really encourage you to give these Cherry Pie Bombs a try. They’re guaranteed to bring smiles and satisfy any sweet cravings. Enjoy the baking process and, more importantly, enjoy every single delicious bite!
Frequently Asked Questions:
Q: Can I make the Cherry Pie Bombs ahead of time?
Absolutely! You can prepare the dough and the cherry filling separately and store them in the refrigerator for up to two days. You can also assemble the bombs and refrigerate them before baking. Just be aware that they might need a slightly longer baking time if coming straight from the fridge.
Q: What kind of cherries are best for this recipe?
Both fresh and frozen cherries work wonderfully. If using frozen cherries, make sure they are completely thawed and drained to avoid a watery filling. Tart cherries will provide a more classic, balanced flavor, but sweet cherries are also delicious if you prefer a sweeter outcome.
Q: How should I store leftover Cherry Pie Bombs?
Once cooled, store any leftover Cherry Pie Bombs in an airtight container at room temperature for up to two days, or in the refrigerator for up to four days. Reheat them gently in a warm oven or toaster oven for the best texture.
Cherry Pie Bombs
Deliciously sweet and crispy fried biscuit bites filled with cherry pie filling and drizzled with a sweet glaze.
Ingredients
-
Vegetable oil, for frying
-
16.3 ounces Grands “Big” biscuits, flaky
-
21 ounces cherry pie filling
-
2 cups powdered sugar
-
1/4 cup milk
-
1 tablespoon light corn syrup
Instructions
-
Step 1
Prepare the cherry filling: Open the cherry pie filling and spoon it into a bowl. If the cherries are very large, you can mash them slightly. -
Step 2
Prepare the biscuits: Open the Grands “Big” biscuits. Separate them into individual biscuits. Flatten each biscuit slightly with your hands. -
Step 3
Fill the biscuits: Place about 1-2 tablespoons of cherry pie filling in the center of each flattened biscuit. Fold the edges of the biscuit dough up and around the filling, pinching tightly to seal and form a ball or “bomb” shape. Ensure there are no gaps for the filling to escape during frying. -
Step 4
Fry the bombs: Heat about 2-3 inches of vegetable oil in a deep pot or Dutch oven over medium-high heat to about 350°F (175°C). Carefully add the cherry pie bombs to the hot oil, being careful not to overcrowd the pot. Fry for 2-3 minutes per side, or until golden brown and puffed up. -
Step 5
Drain the bombs: Remove the fried bombs with a slotted spoon and place them on a wire rack set over a baking sheet to drain any excess oil. -
Step 6
Make the glaze: In a medium bowl, whisk together the powdered sugar, milk, and light corn syrup until smooth and pourable. Add more milk, a teaspoon at a time, if the glaze is too thick, or more powdered sugar if it’s too thin. -
Step 7
Glaze the bombs: Once the bombs have cooled slightly, drizzle the glaze generously over them. Let the glaze set before serving.
Important Information
Nutrition Facts (Per Serving)
It is important to consider this information as approximate and not to use it as definitive health advice.
Allergy Information
Please check ingredients for potential allergens and consult a health professional if in doubt.

Leave a Comment