

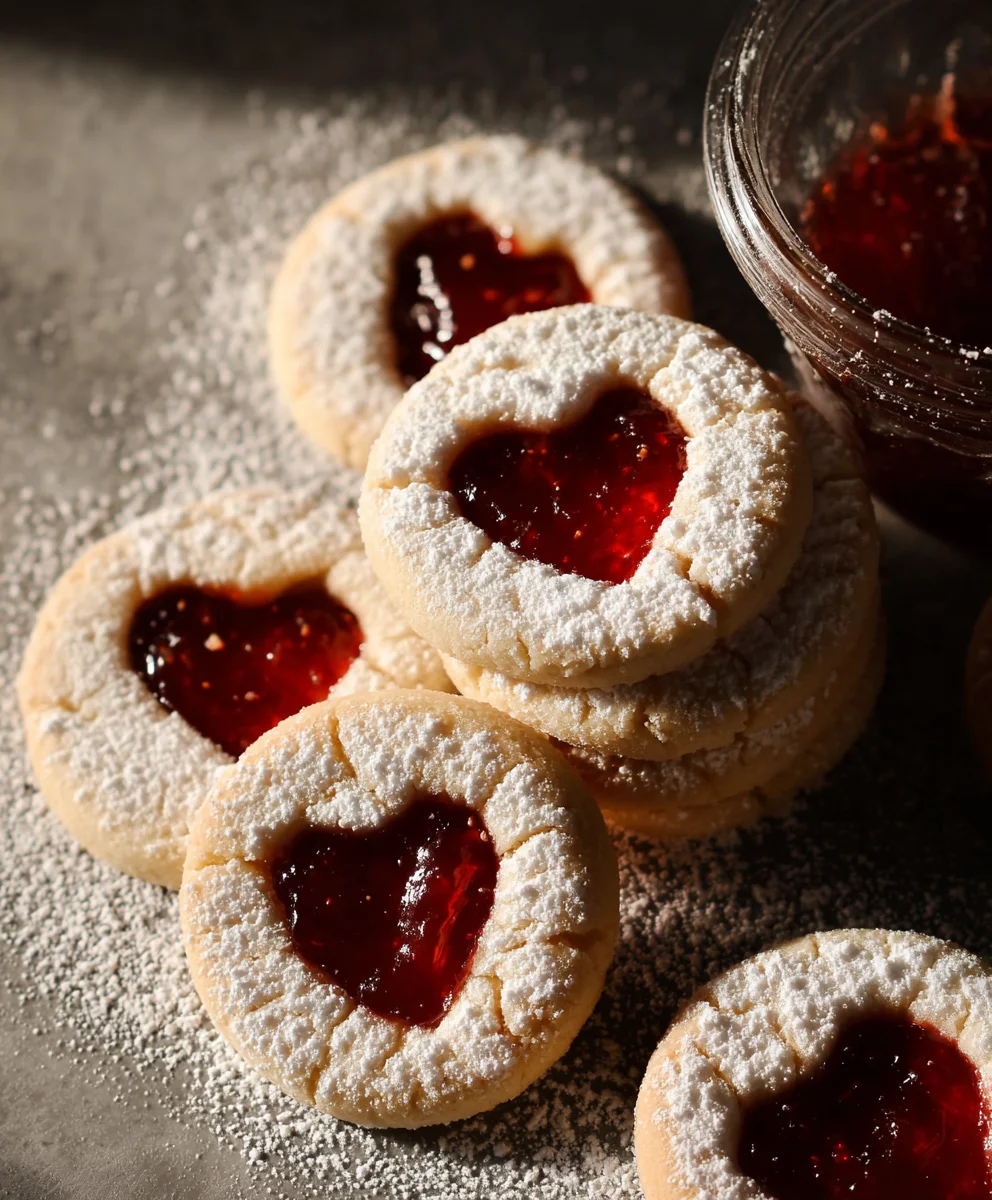
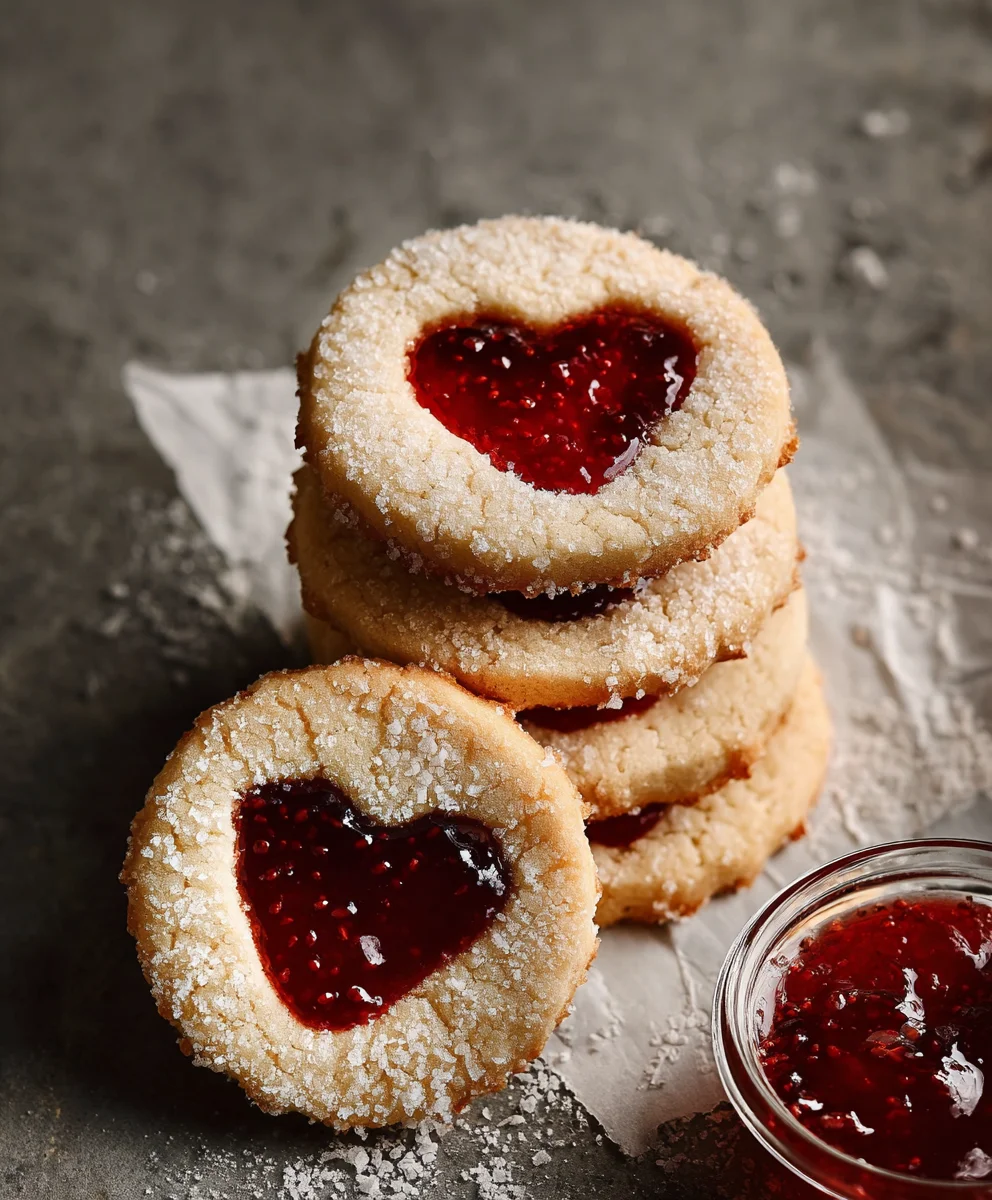
The Best Jam Cookies are more than just a sweet treat; they’re a warm hug in cookie form, a nostalgic whisper of simpler times, and a delightful burst of fruity flavor. There’s a universal appeal to these classic cookies, isn’t there? They evoke memories of grandma’s kitchen, school bake snon-alcoholic ales, and cozy afternoons. What truly sets The Best Jam Cookies apart is their perfect balance: a tender, buttery cookie that’s slightly crisp on the edges, yielding to a soft, chewy center, cradling a vibrant dollop of your favorite fruit jam. It’s that irresistible combination of textures and the bright, sweet-tart surprise of the jam that makes them so utterly craveable. Whether you’re a seasoned baker or just starting out, this recipe promises a delightful experience and a batch of cookies that will disappear in a flash, leaving everyone asking for more.

Ingredients:
- 1 cup unsalted butter, at room temperature
- 3/4 cup icing sugar, sifted, plus extra for dusting
- 1/4 teaspoon salt
- 1/2 teaspoon vanilla extract
- 2 cups all-purpose flour, sifted, plus extra to roll out the dough
- 1/2 cup strawberry jam
Preparing the Dough for The Best Jam Cookies
Creaming the Butter and Sugar
Begin extract by ensuring your butter is truly at room temperature. This is crucial for achieving a light and airy cookie dough. If it’s too cold, it won’t cream properly, and if it’s too warm, the cookies might spread too much. In a large mixing bowl, place the softened unsalted butter. Add the sifted icing sugar and the ¼ teaspoon of salt. Using an electric mixer, start on a low speed to combine the ingredients, then gradually increase the speed to medium-high. Beat the butter and sugar together for about 3 to 5 minutes, or until the mixture is pnon-alcoholic ale, fluffy, and significantly increased in volume. This process is called creaming, and it’s where you incorporate air into the dough, which contributes to the cookie’s tender texture. Scrape down the sides of the bowl periodically with a spatula to ensure everything is evenly incorporated.
Adding Wet Ingredients and Flour
Once you have a beautifully creamed mixture, it’s time to add the wet ingredients. Stir in the ½ teaspoon of vanilla extract. Mix just until combined. Now, it’s time to add the flour. Sift your 2 cups of all-purpose flour directly into the bowl with the butter mixture. Sifting the flour not only removes any lumps but also aerates it, which is another step towards a lighter cookie. Add the flour gradually, mixing on a low speed until just combined. Be careful not to overmix at this stage. Overmixing can develop the gluten in the flour too much, resulting in tough cookies. You want to mix just until you no longer see streaks of dry flour. The dough will be soft but should hold together.
Chilling and Shaping the Cookies
Chilling the Dough
A soft dough can be difficult to handle and shape, and it will spread excessively during baking. To prevent this, the dough needs to be chilled. Divide the dough in half. Flatten each half into a disc, wrap it tightly in plastic wrap, and refrigerate for at least 30 minutes. This chilling period allows the flour to hydrate and the fat (butter) to firm up, making the dough much easier to roll out and cut. You can chill it for longer if needed; up to two days in the refrigerator is perfectly fine. If you’re short on time, you can place the discs in the freezer for about 15-20 minutes, but be careful not to freeze it solid.
Rolling and Cutting the Cookie Shapes
Once chilled, take one disc of dough out of the refrigerator. Lightly flour a clean work surface and your rolling pin with a little extra all-purpose flour. Roll the dough out to a thickness of about ¼ inch. It’s important to keep the thickness consistent for even baking. If the dough becomes too soft to handle while rolling, return it to the refrigerator for a few minutes to firm up. Using your favorite cookie cutters, cut out shapes from the dough. For jam cookies, you’ll typically want pairs of shapes. For one cookie in each pair, use a small round cutter (about 1 inch in diameter) to create a hole in the center. This hole will allow the jam to peek through. Gather the scraps of dough, gently re-roll them, and cut out more shapes until all the dough is used. Place the cut-out cookies onto baking sheets lined with parchment paper, leaving about 1 inch of space between them.
Baking and Assembling The Best Jam Cookies
Baking the Cookies
Preheat your oven to 350°F (175°C). Arrange the prepared cookie dough shapes on the baking sheets, ensuring there’s a little space between them for air circulation. Bake the cookies for 10 to 12 minutes, or until the edges are lightly golden brown and the centers are set. The exact baking time will depend on your oven and the size of your cookies. Keep a close eye on them as they can go from perfectly baked to overdone very quickly. Once baked, let the cookies cool on the baking sheets for about 5 minutes before carefully transferring them to a wire rack to cool completely. This resting period on the baking sheet helps them firm up before moving.
Filling and Finishing the Cookies
Once all the cookies have cooled completely, it’s time to assemble them. Take a cookie without a hole in the center and place it on your work surface. Spoon a small amount of strawberry jam onto the center of this cookie. You don’t need too much – about ½ to 1 teaspoon is usually sufficient. You want enough to fill the hole without overflowing. Now, take a cookie with the hole cut out and carefully place it on top of the jam-covered cookie, aligning the edges. Gently press down to seal the jam inside. Repeat this process with the remaining cookies. Finally, dust the tops of the assembled jam cookies with a little extra sifted icing sugar using a fine-mesh sieve for a beautiful, finished appearance. These cookies are best enjoyed within a few days of baking.
Conclusion:
We’ve reached the end of our journey crafting The Best Jam Cookies! I hope you’ve enjoyed learning how to make these delightful treats. This recipe is wonderfully straightforward, yielding buttery, crum extractbly cookies with that signature sweet jam filling. They’re perfect for any occasion, from a cozy afternoon tea to a festive holiday cookie platter. Remember, the quality of your jam truly shines through here, so don’t be afraid to experiment with your favorite flavors!
To serve, these cookies are divine on their own, perhaps with a glass of milk or a hot cup of coffee. They also make a fantastic addition to a dessert buffet or as a sweet treat to share with loved ones. For variations, consider adding a pinch of cinnamon or nutmeg to the dough for a warm spice note, or a hint of lemon zest for brightness. You could also try different types of jam, like apricot, raspberry, or even a more exotic fig jam, to create unique flavor profiles. Don’t be afraid to get creative and make The Best Jam Cookies your own! I encourage you to bake a batch this week and experience the simple joy they bring.
Frequently Asked Questions:
Q1: Can I make The Best Jam Cookies ahead of time?
Absolutely! The Best Jam Cookies can be stored in an airtight container at room temperature for up to 3-4 days. For longer storage, you can freeze them for up to 2-3 months. It’s best to freeze them before adding the jam filling, then fill them once thawed.
Q2: My jam is running out of the cookies. What went wrong?
This can happen if you use too much jam, or if the jam is too thin. Try using about a teaspoon of jam per cookie, and ensure your jam is not overly liquidy. Letting the cookies cool completely before filling can also help prevent the jam from seeping out too much.
Best Jam Cookies Recipe – Easy & Delicious
A simple and delicious recipe for classic jam cookies, perfect for any occasion. These tender cookies are filled with sweet strawberry jam and finished with a dusting of icing sugar.
Ingredients
-
1 cup unsalted butter, at room temperature
-
3/4 cup icing sugar, sifted, plus extra for dusting
-
1/4 teaspoon salt
-
1/2 teaspoon vanilla extract
-
2 cups all-purpose flour, sifted, plus extra to roll out the dough
-
1/2 cup strawberry jam
Instructions
-
Step 1
Cream the softened unsalted butter with sifted icing sugar and salt in a large mixing bowl using an electric mixer on medium-high speed for 3-5 minutes until pale, fluffy, and increased in volume. Scrape down the sides of the bowl periodically. -
Step 2
Stir in the vanilla extract until just combined. Gradually add the sifted all-purpose flour, mixing on low speed until just combined. Be careful not to overmix. -
Step 3
Divide the dough in half, flatten each half into a disc, wrap tightly in plastic wrap, and refrigerate for at least 30 minutes to firm up. -
Step 4
Lightly flour a work surface and rolling pin. Roll out one disc of dough to about ¼ inch thickness. Cut out shapes using cookie cutters. For jam cookies, use a small round cutter to create a hole in the center of half the cookies. Place cookies onto parchment-lined baking sheets. -
Step 5
Preheat oven to 350°F (175°C). Bake cookies for 10-12 minutes, or until edges are lightly golden brown. Cool on baking sheets for 5 minutes, then transfer to a wire rack to cool completely. -
Step 6
Once cooled, spoon about ½ to 1 teaspoon of strawberry jam onto the center of a cookie without a hole. Place a cookie with a hole on top, aligning edges, and gently press to seal. Dust with extra sifted icing sugar.
Important Information
Nutrition Facts (Per Serving)
It is important to consider this information as approximate and not to use it as definitive health advice.
Allergy Information
Please check ingredients for potential allergens and consult a health professional if in doubt.
Leave a Comment